Click here to view pattern listing on Ravelry
Click here to view Beach Gallery Scarf I
This is the second post about scarves I am knitting, that were inspired by some creative, artistic, knitted scarves I saw in a gallery a few months ago. (For more background, please visit the post for Beach Gallery Scarf I.)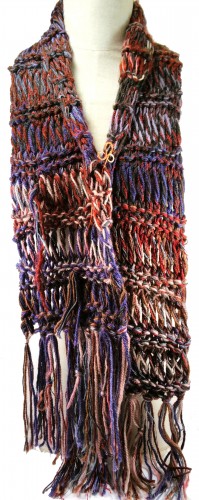
For this version, I once again used Design Seeds to find a color scheme I liked. This time I went a little more neutral, or so I thought. As it happens, my printer printed out the image with a decidedly blue cast, and my selection of yarns reflects that. The first image here shows the original color swatch as published by Design Seeds, and the second image shows the knitted scarf along with the printed color swatch, in natural daylight. I think you’ll agree there was a definite difference in color between the electronic image and the printed one. But it still worked out.


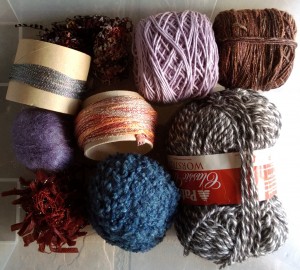
Once again I went looking for some leftovers. I decided at some point not to use any novelty or textured yarns in this scarf, so I had to winnow out a few yarns from my initial selection. The group on the left is what I used, and the yarns on the right are the ones I eliminated from my initial choices. Note the lavender yarn at the top center of the reject pile photo — while it isn’t a novelty yarn, I decided it was too high in value to go with the rest of the choices, which means it has too much white. You can sometimes figure this out by squinting at your yarn pile and seeing which ones don’t look right. Here, for example, the very light lavender stands out too much.

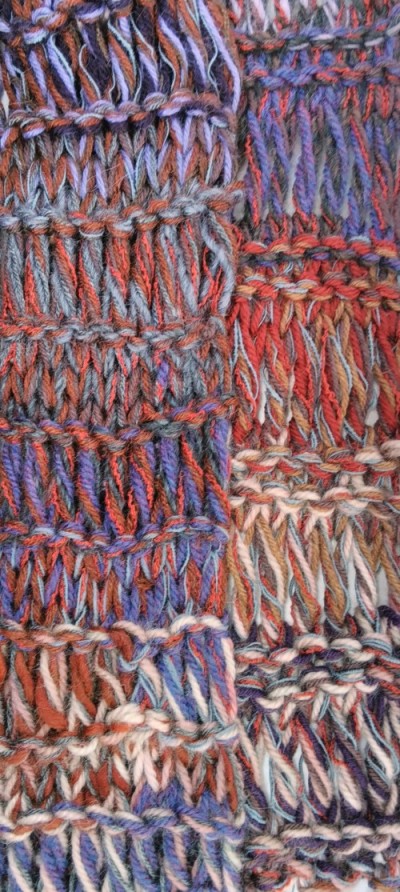
This scarf was to be a standard long rectangle, with some elongated stitches for added interest. I decided not to be random about it, but to incorporate a pattern stitch. I dug out some notes I had jotted probably a good ten years ago, when I had an idea for a lightweight summer poncho incorporating elongated stitches to show off a special yarn (and also, to make it go further). The poncho pattern never went anywhere, but I had always liked the stitch pattern that I had cooked up for it, which was this:
Row 1: (RS) purl
Row 2: (WS) purl
Row 3: (RS) knit
Row 4: (WS) knit twisted drop st
Four rows, easy to memorize and execute. Looks nice on both sides, although technically not 100% reversible — notice how much longer the twisted drop stitches look on one side of the fabric vs. the other side.
But what the heck is twisted drop stitch? I hear you ask. Well, let me show you with my first actual instructional video here on TessKnits.com. (Note: there is no audio to this video.)
Now, back to the Beach Gallery Scarf. Having learned my lesson on the previous project, I went ahead and used size 19 US needles to start with.
I cast on 15 stitches, but the post-blocking final result was a little wider than what I wanted. All knitted scarves block out to be longer and skinnier than the as-knit dimensions, but this one didn’t get as narrow as I had expected — although it did get quite a bit longer. Here is a very casual photo of the piece before blocking, and after blocking, on the same mannequin.
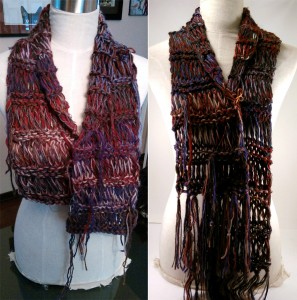
As you can see, I ended up turning my extra width into a nice little shawl collar effect, which I like quite a bit and would probably not have thought of if my scarf had not ended up so wide — they say necessity is the mother of invention right? But if you don’t like that idea you can just cast on 3 or 4 fewer stitches.
Again, for each yarn change, I simply chose a few yarns out of the box and held them together. I ended up changing yarns more-or-less after every 4-row pattern repeat, but I didn’t change all the yarns each time. I probably changed about half the yarns each time, to keep some continuity going.
That stitch pattern again:
Row 1: (RS) purl
Row 2: (WS) purl
Row 3: (RS) knit
Row 4: (WS) knit twisted drop st
For a nice finish that is the same on both ends, end after a Row 2.
Finishing: I wove in most of the ends, but I left a couple of them as random fringes. Finally, I cut and added more fringe across each end, and tied a few random knots between fringe pieces. And enjoy your “gallery” inspired scarf!
Happy Knitting!