As you may know, I am a fairly lazy knitter.
I also prefer knitting to a “recipe” rather than an exact pattern. In fact, written knitting patterns are a recent invention in the knitting world, within the last 150 years or so. It’s my belief that written patterns have proliferated mostly because they benefit yarn companies, who are trying to sell specific yarns — while the “recipe” style is how knitting has been done all over the globe for centuries.
When I’m knitting something basic, like socks, knitting in the traditional “recipe” style gives me a sense of connection to knitting history that I love, as well as it feels more creative to me.
And when it comes to socks, I prefer toe-up socks, for a number of reasons. The main one is that you can get them started without bothering about gauge or math or anything. As long as your needles, yarn, and stitch pattern produce a fabric that is suitable for a sock — a fabric that is a little bit on the firm side — you’re good to go.
So here is my toe-up sock recipe, which includes my favorite sock-knitting techniques to date. No need for needle size, exact number of stitches, or gauge. Choose any weight of yarn, and use any kind of needle/technique for small circumferences you prefer: one circular, two circs, or dpns. And dive right in!
Tess’ Best Toe-up Socks Recipe
Cast On
Using Judy Becker’s certainly-very-clever-but-not-really-magical cast on — cast on about 1 inch worth of stitches on both needles, but make it an even number of sts on each needle. Usually this is around 8 or 10 sts for each needle, 16 or 20 stitches total. There is a video version of the cast-on here. I follow the variation shown here, which maintains the proper stitch mount on all stitches. I think of it as scooping towards me with both needles.
Judy’s CO has some commonalities with the more traditional figure-8 cast on, which is perhaps a little simpler, so if you have trouble with Judy’s, maybe try out the figure-8 version.
Knit one round, then start the toe increases.
Toe Increases
My favorite is the M1/YO increase method, which I learned from Priscilla Gibson-Roberts “Ethnic Socks & Stockings”. It’s an easy, visual way to increase on every other round.
First round: K1, YO, knit to other side of toe, YO before the last stitch, knit the last stitch. Repeat on the other half of the toe. You will have 4 YO’s, one stitch in from either side, on the front and the back of the toe.
Second round: Knit all stitches, taking care to knit the YO’s tbl so they twist. This closes them up. They may look loose, but believe me, they will be fine. I’ve knit DH plenty of socks like this, and he always wears his toes out first — but it’s not because of the YO increases. Also, I doubt any traditional ethnic sock knitter — let alone PG-R who says it’s also her favorite — would have used it if it wore out quickly.
Note: PG-R says that the YO’s must be paired: mounted forwards and backwards so that one slants left and one slants right. She says that there is a difference in how the increases look if they slant into the toe or away from the toe.
Frankly, I never do that, for several reasons:
- One is, backwards YO are just a hassle. That backwards-mounted YO plays havoc with the stitches next to it and slows things down.
- Two is, I have never seen any actual difference in the appearance of a make-1 or YO increase, whether it’s twisted to the left or to the right. That twist is at the very base of the new stitch, and in my experience, it doesn’t angle the increase in either direction, and the effort you put into turning that twist to the left or right hardly shows at all.
- Three is, even if I’m wrong about #2, it’s the toe of a sock. No one is going to be looking at them that closely. Doing both ways, and keeping track of which is which, is more trouble than it is worth to me for something where no one is ever going to notice the difference.
I told you I was a lazy knitter! But, if all that hasn’t convinced you, and you want to make half your YO’s backwards, by all means, go for it.
Either way, what’s great about this increase method is that you always know which round you’re on. If it has YO’s already, you knit them twisted — if it doesn’t have YO’s, you put them in. Easy to execute, easy to read, works great. And you simply increase until the toe is the right size. See? No need to worry about gauge!
So, (M1/YO) inc to 64 sts or thereabouts, or whatever suits your sock wearer. A snug fit around the foot is what you are after. Extra fabric bunching up in your shoes is not pleasant. If you have a foot available to measure, you can do that and then subtract up to a half inch for negative ease, and then divide by two to see how wide your sock toe needs to get.
(I do find it’s easy for me to overshoot the toe — it tends to look smaller than it really is.)
Toe Repair Insurance
I like to knit a round or two of plain stockinette here, no increases, no patterning — because as mentioned, DH wears out his toes first. It’s nice to have a couple of plain rounds where you can come back and pick up stitches easily for a new toe. You could even do those plain rounds in a different yarn, if you thought far enough ahead.
Foot
Here is where you can have some fun. Work the top of the foot (the instep) in whatever pattern your little heart desires. (Keep the sole stitches in plain stockinette.)
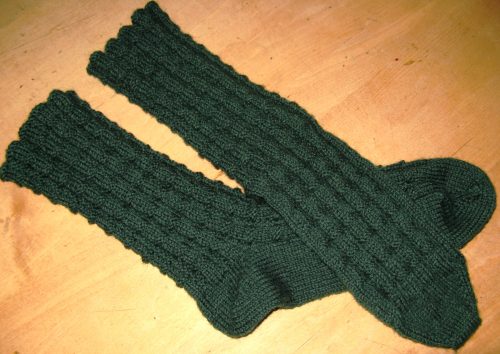
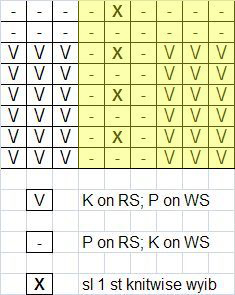
The lazy knitter likes simple, easy-to-memorize-and-count stitch patterns. For the green pair shown at the beginning of the post, I used this textured ribbing pattern. Here’s the chart: notice the repeat is 6 stitches, plus 3 — for the extra 3 knits on the left, to center the pattern when it isn’t being knit in the round. (Another way to think of it is when it ought to have matching edges, as it does on the instep.)
Two things to think about here: the repeat for the pattern when it’s in the round is going to be a multiple of 6 stitches, without that extra three on one edge. And socks done this way are always a multiple of 4 stitches.
So what to do if you have 64 stitches on your sock toe (32 stitches for the instep)?
What I would probably do is increase 2 stitches after my toe insurance round, to get 66 stitches total. This takes care of the leg, because now you will have a multiple of 6 stitches for working the pattern in the round. Happily, this also gives you 33 stitches on the instep, for a nice multiple of 6 plus 3, for working the pattern with matching edges. I love it when a plan comes together!
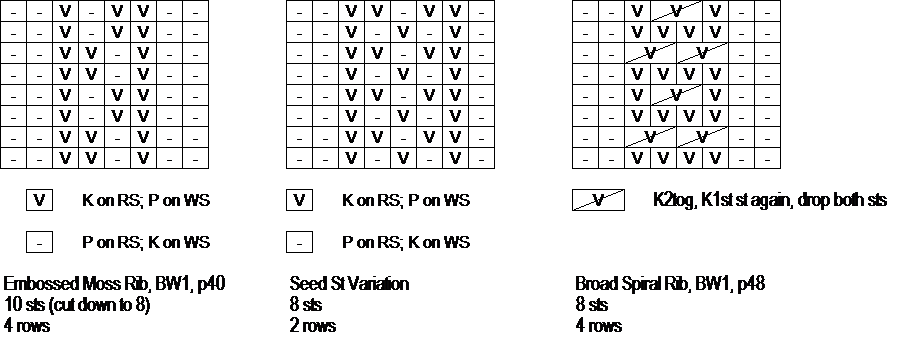
Other ideas: 2 x 2 rib is always an option. And below are three more simple stitch patterns I’ve used for socks.
Work the foot until it is long enough to come up to the bend at the ankle.

Heel
A few years ago, I went on a mission to find The Perfect Sock Heel. I test-knitted every short-row heel I could find: the ones with backwards YOs, ones with wraps, ones with double wraps, twisted wraps, you name it. I wasn’t too happy with any of them. Then I found the double-stitch short-row heel, and I stopped looking. This is a fabulous heel. To date, it is easily the most popular post on this blog, with over 50K views.
And it would be my absolute favorite if it were not for one thing: it still is not easily replaceable. The two rows that go all the way around the sock in between the two short-row wedges make it difficult to cut out the heel and re-knit it. However, it can be done. You need to retain a couple of lengths of yarn on each side of the heel (the rows that go all the way around) and weave those into the remainder of the sock. You can then insert an afterthought heel.
The ease of replacement is perhaps the best thing the afterthought heel has going for it. So it’s kind of a toss-up to me whether to do a short-row heel and then when it wears out, replace it later with an afterthought, or just do the afterthought in the first place.
Click here for my double-stitch short-row heel tutorial.
** Be sure to make a note of what row you just finished in the pattern stitch for the instep, if you used one. **
Afterthought heel: I like the instructions in Afterthought Heel Socks by Kaity Fraker. The only thing I do differently is that I prefer to do my afterthought heels with feathered decreases rather than strong ones, because I don’t like the look of the “strap” that forms with the strong decreases. I also think that strap is prone to extra wear.
So I flip the SSK and K2tog, like this:
Standard method (“strong” decs)
Round 1: *K1, SSK, K to last 3 st of needle, K2tog, K1, repeat from * on other needle. 4 sts decreased.
Round 2: K around.
My method (“feathered” decs)
Round 1: *K1, K2tog, K to last 3 st of needle, SSK, K1, repeat from * on other needle. 4 sts decreased.
Round 2: K around.
Leg
Resume (or start) your stitch pattern, in the round this time. If you are using a heavily textured pattern stitch you may choose to continue knitting a half-inch to an inch of the back of the leg in plain stockinette. I usually make the leg of my socks about the same length as the foot.
Add ribbing, if your stitch pattern isn’t ribbing.
Tess’ Simple Stretchy Bind Off
I don’t mess with the “surprisingly stretchy” thing. It’s too complicated and too hard to remember for a lazy knitter. I use my own super-stretchy KFB bind-off instead.
Here’s the very simple thing that I do: On every knit st in my ribbing, I do a KFB as I bind off.
For example, if I am doing 1 x 1 rib that starts with a knit stitch:
- Perform a standard KFB in the first knit stitch. There will be two stitches on your right needle. Bind off the first stitch by lifting it over the second stitch.
- Purl the next stitch. There will be two stitches on your right needle. Bind off the first stitch by lifting it over the second stitch as usual.
- Knit into the front of the next stitch, but do not drop it off the left needle. There will be two stitches on your right needle. Bind off the first stitch by lifting it over the second stitch, while still maintaining the old knit stitch on the left needle.
- Knit into the back of the old stitch on the left needle and drop it. There will be two stitches on your right needle. Bind off the first stitch by lifting it over the second stitch.
- Repeat steps 2-4 until all stitches are bound off. Cut working yarn and pull through.
This creates a 50% increase in the stitches on this round only, and they are immediately bound off. Hugely stretchy! Extremely simple! Looks nice and neat, too.
I’ve successfully used the KFB bind-off on anywhere from 40-50% of the ribbing stitches. I have done one using KFB on only 20% of the ribbing stitches, and that bind-off is a little tight. So I would not suggest using the KFB bind-off on anything less than 25%, or 1/4 of your stitches.

2 comments for “Designing: Lazy Toe-Up Socks from Scratch”