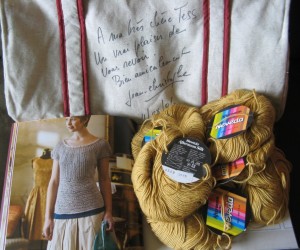
 The other day, I was browsing around on Ravelry, looking for tops with drapey necklines. For some reason, I ended up with this new project instead: the Paloma cap-sleeve blouse from French Girl Knits. I already had the book, and I was soon able to match it up with an appropriate stashed yarn. This is what makes Ravelry great! I was off and knitting within minutes.
I’m using a vintage yarn made by Neveda: it’s called “Afternoon Silk” in a harvest gold. 45% MOHAIR, 35% virgin wool, 20% silk. And because the pattern is from “French Girl Knits” I am using my autographed-in-French-by-Jean-Christophe-the-guy-who-runs-Anny-Blatt-and-Bouton-d’Or knitting bag.
But barely two paragraphs into this project, and we’re already at confession time: I should probably know better, but I started this without blocking the gauge swatch. I did knit two swatches, and I even did them in the round, but did not block or measure with precision. I was in that kinda “close enough” mood…
After a couple of inches’ worth of yoke, though, I became concerned that it was going to be too big. So, I put it on some extra needles, laid it out as flat as possible, and took some measurements. The neckline was right on target, but I was still unconvinced. This was mainly because I almost always have to drop down at least one needle size, and usually two sizes, from the pattern suggestion. This time, though, my half-baked swatching approach had led me to use the same needle size as suggested.
And I was beginning to feel the sinking feeling of the inaccurately swatched, and the imminent frogging.
So, I went back to Ravelry. And after looking at several pics of other people’s Palomas, I became convinced that this top looks terrible if it is too tight over the bust — so that fear was alleviated. Another reason to love Ravelry!
But I noticed some other things while looking at those pictures, and oh yes — there’s gonna be some changes made…
The first thing I noticed was that a fair number of the FO’s appeared to be snug or even tight over the bust — even the ones that appeared to fit properly in the shoulders. After studying the pictures, I concluded that the change in pattern stitch just above the bustline is in what I can only call an unfortunate spot. The yoke switches from a few ribs with a lot of laterally-spreading seed stitch in between, to 100% ribbing. We all know ribbing pulls in, yes? Now, this rib stitch isn’t quite like regular K2P2 rib, but — it still pulls in some, and it pulls in more than seed stitch.
So, design issue #1 — the change in pattern st just above the bust causes the fabric to draw in at EXACTLY the point where most women need more fullness, not less!
My solution: I decided to maintain the bodice in the seed st pattern all the way down past the bust. I’ll change to the Granite Rib pattern underneath the bust — which will also cause the fabric to draw in right where it needs to draw in. Clever, no?
The bonus here is that the Granite Rib section has very definite vertical lines, which draw the eye up and down instead of from side to side, and that is exactly what we want to happen in the waist area. By the same token, the more widely spread ribs of the yoke pattern over the bust will tend to draw the eye from side to side, and will make the bust appear nicely full, rather than visually squashed inwards by the change in the lines formed by the stitches.
Design issue #2 — I didn’t like the way the pattern’s recommended increase technique looked in the seed stitch panels. Klunky, and far too obvious.
My solution: I used KFB, the “knit front and back” increase — also known as the moss stitch or seed st increase, helllooooo, because it is practically invisible in the middle of seed stitch. MUCH improved appearance.
Soon I was able to try the yoke on for size, and discovered that I had dodged the bullet from my lousy swatching! As far as one can tell from a couple of inches of fabric, it fits! Well enough to keep going, anyway…
