You may remember that one of the things I recently finished was a pair of short socks for DH. Unfortunately, they turned out to be short in multiple places: one of which was the leg, as intended, and one of which was the foot, which was not.
And you may also recall that Sheryl’s remark opened my eyes to the fact that instead of tearing off the whole heel and lengthening the foot in the direction it was originally knitted, I could simply remove the toe of the sock, and lengthen it from that end, going in that direction.
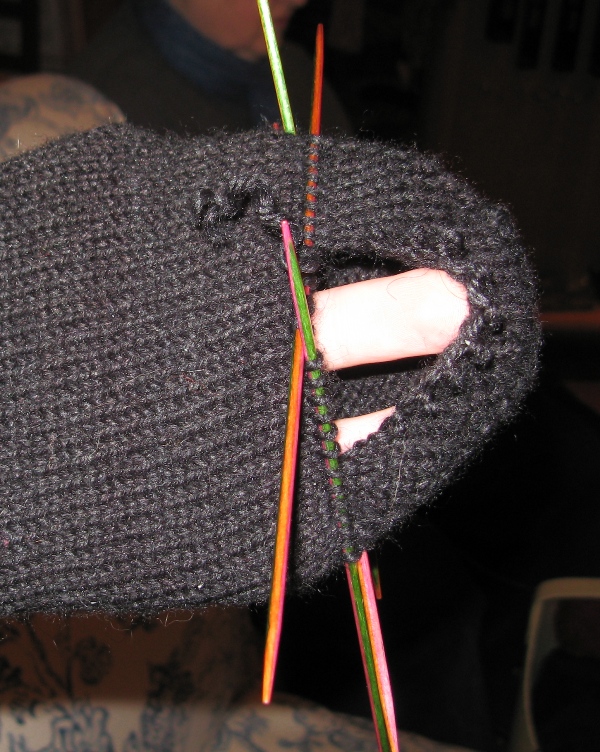
Yes, you can seamlessly knit stockinette st in either direction, especially if it’s in the round. But some people *ahem* have to be shown before they will believe, oh ye of little faith who know who you are. So I took the socks in question to the Friday Group class, and now we have a little dog and pony show photographic documentation of the process to post today.
Actually, by now, this to me is a familiar chore — because one of the many great things about DH is that he wears out his handknit socks at the toe, NOT the heel. Heels can be a real bear to replace — especially that flap-and-gusset style.
In comparison, toes are EASY to remove and reknit. And here is the step-by-step explanation of how I do it.
1. Put your non-dominant hand inside the sock. Decide where you need to start re-knitting the sock.
If the sock was knit top-down, picking up the toe decreases aren’t that big a deal, and you can actually pick up just about anywhere prior to the point where the hole has appeared, even if it’s halfway up the toe. I mean, why do more work than you have to? But if you’re having to use a different color of yarn to repair the toe, you may want to go ahead and redo the whole toe for aesthetic value.
Toe-up socks are a little more difficult. It’s very tricky to pick up toe increases when you’re really trying to head in the other direction. So you’re probably better off redoing the whole toe. Find where the toe shaping is completed — with any luck there is nothing going on there except plain ol’ stockinette in rounds.
In fact, when I knit socks for DH now, if I’m being particularly clever, I’ll throw in a couple of rounds of plain stock after I finish the toe, and before any patterning starts, specifically for the purpose of making it easier on myself to do the toe repairs later on. You could even do a single round of a different (but coordinating) color, I suppose — kind of like the commercial “gold toe” socks. I haven’t resorted to that yet, although it strikes me as a great way to practice this.
But supposing that you don’t have any plain rounds after the toe?
You can take a stab at picking up the very last round of the toe, with its attendant increases — but of course this complicates things a bit. However, any knitter who has gotten this far can probably figure out some way to deal with the odd loosey-goosey bits once the thing is back on the needles: pick up some extra sts and then decrease them away on the next round, or something.
Of course, it is possible to pick up pattern sts in this manner, but it’s definitely less straightforward. I suggest you try this on something nice and plain before you go for, say, cables.
2. Run some needles through all the sts on this round.
Being able to run a needle through an existing row (or round) of sts is a skill that admittedly takes a bit of practice. (I’ve had a few years and more than a few knitting mistakes with which to work on it.) Your biggest challenge is going to be keeping to the same row/round and not jogging up or down off it onto a different row.
One good way to practice this skill — as alluded to above — is to knit yourself a swatch with a single row in a different color, and then practice picking up that row.
Do this from the right side of the fabric, and use a spare needle to pick up the right leg of every loop. Get yourself some really good lighting and that’s half the battle. Another excellent tactic is to use needles smaller than the ones used to do the original knitting.

3. Snip a single st in the round above the one that is now on the needles. The knitting will probably start to disintegrate.
4. Use another needle to pick out the round above the one on the needles — starting from that st you just snipped. Pull on each half-stitch in turn to release the yarn from the sts on the needles. This tail will get pretty long pretty quickly, and can become a pain to pick out half-stitch by half-stitch. If you don’t plan on re-using this yarn, you can snip it short every so often.
(Note: there is no sound on this video.)
5. When you get all the way around the sock, OMG!! the old toe will fall off, and you will be left with what we hope are mostly all the sts of one round on the needles, and a tail of used yarn from the unpicking. At this point, I usually go once around the sock slipping all the sts, to check that they are all members of the same round, and no one got dropped or turned around. It’s cheap insurance.
6a. If all you are doing is replacing a worn-out toe, then tink the new round back to the side of the sock where the toe shaping usually begins. MAKE SURE your new toe lines up with the old heel. Tie on new yarn and knit a new toe. Weave in ends.
6b. If you need to add length to your sock, do so and then reknit the toe.
Voilà! and Happy Knitting!
