
Moving on… OK, I’ve mostly gotten over the betrayal and the disillusionment (described in full & dramatic detail in part 5).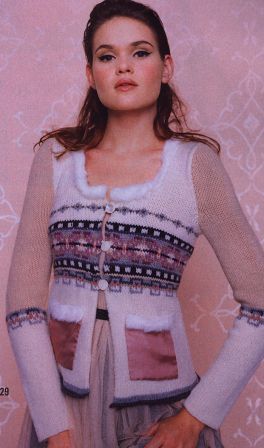
I really did drape that 37" of fabric around me for a few seconds, trying to convince myself I didn’t have to rip it all out. But even I can’t lie to myself quite THAT much. (Somewhere in there is a bawdy joke about lies and 8 extra inches, but I digress.)
Nope, all that completed knitting will have to go. Rip, rip, rip. Sigh, sigh, sigh. Best to get it over with quickly, and it always helps to have a little sympathy. So I took the poor thing to my Friday morning group class, and shared my sorrow with my peeps. They were most helpful ("So, that blog is turning into a good outlet for you?").
Well, obviously I’ve made my decision: I will be knitting the sweater shown in the picture — and by golly, after all this additional work, it’s going in the freakin’ State Fair if it comes out all right. The Pats has a vision of me saying, "nyaaah, nyaaah, nyaaah," once it’s all done, and she may have a point there — especially if I can wave around a blue ribbon as I say it — but methinks a better idea, long-term, is to document exactly what I do, so others can do the same. Eventually, none of us will be fooled by the magazines’ photographic lies. That will be my revenge.
Aaaand to get to that smug happy ending, we need to do a little of the M-word. That’s right – MATH.
Here we go!
STEP 1. Find desired circumference at hips, bust, and waist (inches and stitches).
My hips are about 38", so with the gap in the bottom front as shown, the 37" we started out with is fine. 168 sts at the hips.
I want the sweater to be about 29" around at the waist: 29" x 4.5 sts per in = 130.5 sts. 130 sts at the waist.
An interesting note: look at the bottom of the FI band on the model. Count the square-ish motifs at the bottom and you’ll see that there are just about 8 repeats of that motif visible on the front of the sweater. Those are 8-st-wide motifs. That means that there are only about 64 sts, give or take a few, across the front of that sweater and, multiplied by 2, about 128 sts all the way around that model’s waist.
Hmmm… how odd. According to the instructions, there are still 168 sts on the needles at the waist. Gee. I wonder where the other 40 sts are in the picture? Not that I’m still bitter about this, or anything. But, this does give me confidence that I’m on the right track now.
The original bust measurement of 35.5" is also fine, although we will be ignoring that gauge change, so: 35.5" x 4.5 sts per in = 159.75, or 160 sts at the bust.
STEP 2. Find desired distance (or length) between bust, waist, and hips (inches and rows).
As designed, the length of this sweater is 22.5". With a priori knowledge of some of my personal fitting issues, I know I want to take an inch out of the armhole area (to match what I did on the sleeve) and usually another inch comes out around the bust-waist area because I am short-waisted. Basically I am changing to a petite sizing. You probably already know if you have length issues in ready-to-wear, or you can create a sloper of yourself, as mentioned back in Part 4. We already know my row gauge is 6.75 rows per inch, as measured from the sleeve.
|
back neck to bust (measured)
|
7.5"
|
51 rows
|
|
bust to waist (measured)
|
5.5"
|
37 rows
|
|
waist to bottom of sweater (8" per design – shortened by choice)
|
7.5"
|
51 rows
|
|
total length
|
20.5"
|
138 rows*
|
*This doesn’t add up properly yet because of rounding errors — but for now, I don’t worry about it because I may eventually move something up or down a row — for example, so that the shaping ends up being on RS rows.
Another critical measurement to know is how deep you want the armhole to be, and how far from the bottom of the sweater the armhole is going to start. The armhole as designed is 8" deep, so subtracting out an inch for me = 7" deep. Therefore, 20.5" total sweater length – 7" of armhole means my armhole starts at 13.5" from the bottom of the sweater.
|
armhole depth
|
7"
|
47 rows
|
|
bottom of sweater to beg of armhole
|
13.5"
|
91 rows
|
STEP 3. Set up tracking sheet with what we know so far.
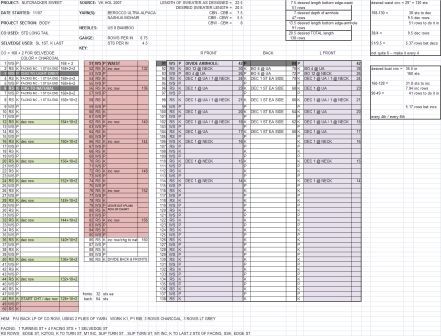 Here’s where I start setting up my tracking sheet for the body. I make a spreadsheet with room for 138 rows, and mark the appropriate rows for the waist (row 51) and armhole (row 91). I add in my color changes, and mark off the section for the FI chart.
I also put in the armhole and neckline shapings, from the original pattern, as well as what my st counts should be (at the places where I have that info, anyway). Here, since the fronts and back are all in one piece, I split up the neck & armhole shaping into 3 separate columns.
At the bottom, I jotted a note to myself about how to work the facings in case I forget.
(The boxes you see at the top and right are where I did most of that mmmmmmath I was just talking about. Another advantage of using a spreadsheet!)
STEP 4. Determine shaping from bottom of sweater to waist.
So, I have roughly 50 rows in which to shape the waist: in other words, to get from 168 sts down to 130 sts. This means I have to lose 38 sts total. I’m going to decrease at 4 points on each dec row — before and after each "side seam" — so I’ll lose 4 sts every time I do one. 38/4 = 9.5 dec rows, so I’ll round that up to 10 dec rows, which means I’ll have 128 sts at the waist.
(BTW, notice I chose to round the # of inc rows up to 10, instead of down to 9. This brings the # of sts at the waist down to 128, rather than up to 132. I chose to go this way because that gives me a nice multiple of 8 to start my Fair Isle pattern off with.)
You might think that 50 rows total / 10 dec rows means we would throw in a dec row about once every 5 rows. However: we will want a few rows before the first one and potentially a few rows after the last one — so the usual technique is to take the number of dec rows needed and add 1 to it, which makes 11, and then divide the 50 rows by that. We end up with something less than every 5 rows.
Also, I will be doing some color changes in the first few rows as well as increasing for the miter on the bottom of the facings — which doesn’t mean we can’t do some waist shaping at the same time — but I confess that in this rather "special" case, I ripped back my previous knitting only to about row 8 so I wouldn’t have to do those particular bits again. Call me lazy if you must: just please don’t tell the State Fair judge. It’ll be our little secret.
And finally, no one wants to do shaping on WS rows, which we would be doing if we did it every 5th row.
So, let’s just see what happens when we go with decreases every 4 rows… again, here is part of the beauty of doing all this prep work on "paper", or at least on a spreadsheet. I find if I put a dec row at RS row 48 (just before I hit the waist at row 51), and work backwards placing one every 4th row, I wind up starting my dec rows on row 12. Fine by me!
The actual working of the decrease rows goes like this: I’ve placed markers at each "side seam", one between the right front and the back, and one between the back and the left front. When I approach those markers, I do an SSK at 3 sts out — so it’s actually done when I have 5 sts before the marker, and I use 2 of them in the SSK — then I knit the rem 3 sts and slip the marker. On the other side of the marker, I knit 3 sts and do a K2tog — thus ending up with an SSK and a K2tog separated by 6 sts. I perform exactly the same maneuvers at the other "side seam".
Now I can at least get started knitting again. Hey, look at that!! nice neat side shaping, beautiful facing — obviously not blocked, and still no hem yet, but then again Rome wasn’t built in a day.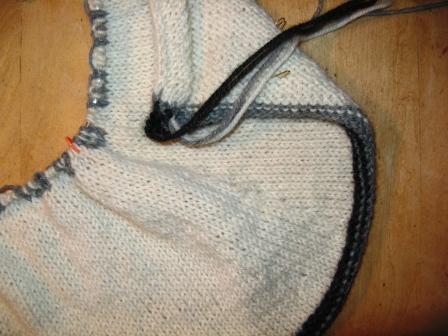 ..
..
I hate to admit it — or maybe I’m gloating, I don’t know — but after all that whining and ripping back on Friday, this actually WAS knit in a day. I was able to reknit the whole entire bottom section on Saturday, during one car trip out to Mt. Hood for a day of snowboarding, while good ol’ DH did the driving. Another advantage of shaping is that at least in this section, those rows keep getting a little shorter and thus a little faster!
As you can see there’s even a teeny bit of FI just getting started there, so next up will be STEP 5, determine shaping from waist to bust, including that wretched FI panel.