Or to put it another way, the Turn of the Screw. Emphasis squarely on the word "screw".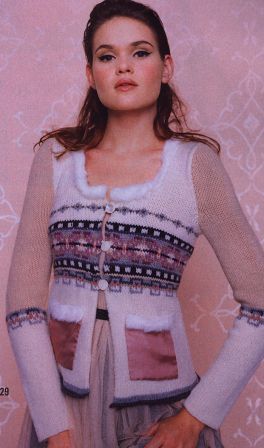
Because get ready, kids — here’s where it all falls apart. Or at least it gets a whole lot more complicated. Turns out I picked a real doozy to start off the Playing Lessons with…! But let’s not get ahead of ourselves.
So, it’s time to start knitting fixing the next part: the bodice.
Two main concerns here: 1 = fit, and 2 = looks. (In this case, I mean the looks of the Fair Isle panel, and the color changes I made when I chose my yarn.)
The fit
A glance at the schematic indicates there is no side shaping whatsoever. Well, since I am firmly against boxy sweaters, I was originally planning to add some in. After all, adding side shaping is usually a pretty simple matter, and I definitely want my sweater to look as cute as in the picture…
(I mean, this is the picture that originally made me want to knit the darned thing in the first place. Also, the directions say that the sweater is shown in a size small, which is the same size I am making.)
… and isn’t that interesting, how the sweater on the model looks as though it already has shaping: see how it definitely appears to get larger from the waistline to the bustline???
In fact, it looks as though it’s a teensy bit tight all through there, iffen you take a good look at the buttons, which appear to be a tad strained, even…
(If you’ve read my post "Worth a Thousand Words, or Not?" you’ll know that this should have been a big red flag the size of freakin’ Tex-ass. But I got fooled.)
Well, in preparation for adding in my shaping, I started looking more closely at the schematic, and found that it actually wasn’t correct.
At first, the schematic looks like it’s just a straight-sided sweater. OK, but see where there are two circumference measurements given at the bottom? That indicates there is a circumference change. One that is not drawn, as a matter of fact.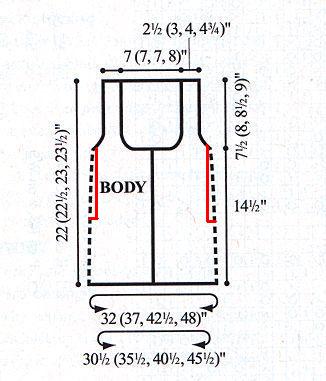
Instead, the correct schematic would look something like what I have drawn in red.
The garment pictured in the magazine’s photo also looks like it gets smaller from the hips to the waist — although in this case, I assumed that’s just an optical illusion.
The directions state that the bottom of the sweater is a simple rectangle of straight stockinette. So, imagine taking a rectangle of fabric, and wrapping one of the long ends around your waist and fastening it. The other long end will spread out around your hips, creating a look similar to the "skirt" of this sweater. This sweater gets away with this because it isn’t intended to be fastened at the lower edge — it’s designed to hang loose with a gap.
While this won’t make for an evenly hanging hem — it would have been a bit more kosher to accomplish this with actual shaping — hey, what the heck, let’s keep it simple.
Here was my big mistake: between fixing the schematic to decrease the circumference of the top half, and explaining away the non-shaping of the bottom half, yours truly managed to delude herself into thinking that this constituted actual shaping, and that somehow, miraculously, this rather blocky shape would transform itself into that shapely little cardigan shown in the picture. Actually, in engineering terms, this design could only be called a "first approximation" of a shapely cardigan.
By all means, let’s cast on 168 sts (plus facings, plus selvedges) and work even for 8" — because I really was kind of jonesing to try out the facing thing anyway.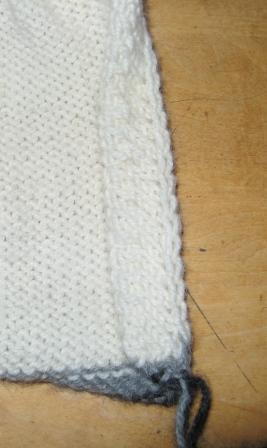 And doesn’t that look nice? It’s still on the needles and hasn’t been properly blocked, but still. (And notice how that lower edge is curling so you can barely see the 3 rows of charcoal and 3 rows of light gray? For future reference, in case you ever want to make a rolled edge, 6 rows of stockinette is in fact how much it takes to curl once around.)
So, now that I’ve gotten that 8" worth of knitting done, I’ve figured out some ugly truths about this pattern. First up: in real life, there’s apparently going to be 37" worth of fabric around my waist. Uh-uh.
Yes, I know that’s blindingly apparent from the schematic, but somehow I didn’t catch that. Now, after having knitted 50-some-odd rows of it, I have a thorough understanding of just how big 37" of knitted fabric is.
While the "rectangle" idea described above might sound good in theory — think for a second about your waist measurement and your hip measurement, and you’ll quickly realize (quicker than I did anyway) that a rectangle that fits around your waist won’t even begin to go around your hips with only a 2" gap in the front. For it to more-or-less circumnavigate your hips, it will have to be several inches too big at your waist.
Are you going to try to tell me that that model is wearing 37" of fabric around her waist?? I now strongly suspect that the garment pictured here has a great big clip or two in the back of it, holding back all that extra fabric. And frankly, I am pissed.
Second ugly truth: hang on a minute — if there’s no side shaping in the pattern, how exactly does that 37" we start out with turn into "only" 35.5" at the waist?
After reading over the pattern, and trying to figure out how the circumference change is brought about (magic?) — I finally figured out that the design depends on a gauge change in the Fair Isle portion, to do some pulling in of the fabric.
The stitch gauge is supposed to change, from 18 over 4" in the plain stockinette section, to 19 over 4" in the Fair Isle panel. Which, over the 168 sts I’m supposed to have, decreases the circumference from 37" to 35.5".
Well. Color me startled.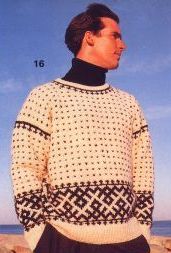
I have a bit of an issue with that assumed gauge change. Fair Isle knitting, when properly done, really shouldn’t change your stitch gauge! Of course not! (snort) Otherwise, every single mostly-plain sweater in the world with a little band of Fair Isle on it would be expected to pull in similarly.
Imagine: Scandinavian-style sweaters with the little bands of "ljus" (like this one here) would look like accordions, pulling in and out every few rows, I suppose. Who’da thunk those hip old Norwegians invented the puffy quilted vest look so long ago? What sort of knitting voodoo was used here to prevent the sleeves from belling out, leg-o’-mutton style, between the upper and lower FI bands?
 More disturbing than that: on my Nutcracker sweater, look at that inch or so of plain stock between the main FI band and the small one at the top. Does this mean my sweater is supposed to pooch back out to 37" for an inch at my armpits? Attractive…!
I think not. While the FI portion of such a garment will certainly not have as much elasticity as the rest, it is not in fact supposed to be smaller.
So — if I knit the FI band properly, now I’m looking at a sweater that is a straight 37" up and down — which is simply going to be too big for my meager bust.
Or — still assuming I could live with all that fabric at the waist — I could drop down a needle size at the FI band, to tighten up the gauge there to get to the 35.5".
This is crap.
Here lies the critical flaw in the design: someone decided to avoid doing any shaping in the FI section. So that means the whole top section has to be as large as the bust measurement + ease, in other words 35.5", all the way down to the waist. What you are going to get as a result of this decision is certainly not what is shown in the picture. It wouldn’t even look attractive. It would look like a delicate, pastel, fur-trimmed … SMOCK.
I didn’t sign up to knit a smock, people.
I think I know why they did it, which is the same reason I talked myself out of thinking I had to do it — which is that it’s going to be a whole lot more work mucking about with shaping in the Fair Isle panel.
I probably should have accepted that unpleasant reality way before this. But I really wanted to believe that the cuteness in the picture was accurately portrayed, and accurately distilled into the written directions — which, after all, is why I pay good money for the damned magazine in the first place.
Frankly, I thought that of all the magazines out there, Vogue Knitting at least was someone you could trust. I thought they had more class than to choose to lie to their customers. I still believe they used to have more class than that, anyway: I have never come across anything like this in my two previous decades (80’s and 90’s) of knitting things out of VK.
The other part I have a lot of trouble with is that they’ve printed plenty of patterns — some in this very issue — that were far more ill-fitting and far uglier, IMHO, than this smock — so what exactly was the big idea with disguising this one?
Well, LISTEN UP, VOGUE KNITTING of the NEW MILLENIUM. (And all the rest of the knitting publishers out there.) THIS SUCKS.
If I have to put this much effort into redesigning your so-called "instructions" in order to actually get what I see on your pretty glossy pages, then I say, screw you back.
I don’t have to buy [Vogue Knitting ->] to do this. I can open up my mailbox and find dozens of free catalogs with tons of cute clothes in them, which will give me about as much guidance, and a lot less frustration.
Right now, my enjoyment of this project has pretty much gone bye-bye. Originally, I was confident that I could overcome the obvious shortcomings that I could see right off the bat, i.e. the hems & the facing, etc. I was even looking forward to the challenges involved. But NOW what?? Besides throwing over $100 worth of yarn in the trash, or sending a letter bomb to the offices of Vogue Knitting, I mean.
After calming down a bit, and mulling this over for a while, I have concluded that here are my options:
1) redesign the whole bodice — probably in pieces — to include proper shaping. While this is the only real solution to all the issues, I admit it is really unpalatable — partly because I am loathe to rip out what I’ve already done, and start over.
2) if I can’t face that, then working with what I’ve already got so far, my best bet is probably going to be try on the "skirt" part and see just how bad all that extra fabric is, if I bunch it up around my waist.
option A: If it’s liveable, then I can work in a casing at the waistline, just before embarking on the FI section, and thread an organdy ribbon or something through it and use that to pull in the waist, and maybe tie it in a bow or something. If I’m REALLY lucky, that may be enough of a fastening, and I can scrap the buttons. Another option could be to place a ribbing panel across the back to pull it in. (However, if it doesn’t work, the ribbing panel is stuck there for the duration, while the casing could be easily picked out and removed — prior to throwing the rest of the sweater in the trash, I suppose.)
option B: If it’s not liveable, I *may* be able to decrease that skirt circumference down to an appropriate waist size by some fast & brutal decreasing — I’ll probably have to rip back at least some of what I’ve done, but some may be salvageable.
Either way, I will have to change my st count at the waist, which will play havoc with the FI panel, so then I get the fun of redesigning the FI band to include the increases that should have been there in the first place.
Big sigh. I’ll have to get back to you on what I decide to do.
Actually, it is not 100% fair of me to say that the increases "should" have been there — that makes it sound like the designer’s fault, and I don’t know that for a fact. It all depends on whether the designer’s initial sketch was for a fitted design, or not.
- If it was supposed to be fitted from the get-go, and she designed it without shaping – then yeah, there’s a "design" problem there.
- If it was supposed to be fitted, and she designed it with shaping, and then someone else decided that was too complex and removed it – that’s an editorial problem.
- If it wasn’t supposed to be fitted, and she designed it without shaping, and the magazine staff decided it didn’t look too good and decided to "fix" it for the photo – that’s an ethical problem.
It has now occurred to me that some of the many oddities about this design could be explained away very simply, if the body of it was originally knit on a machine. That would explain why the body is in one piece, and might explain why it has no facings or hems or real shaping. It would be a snap to whip out 8" of plain stockinette, and I suspect it wouldn’t be too hard to whip out another 40 rows of Fair Isle if your machine can do it. I am not sure if, on a knitting machine, Fair Isle would have a different gauge than stockinette, or if that was perhaps a "clever" thing to try to approximate some shaping, by just turning a tension dial.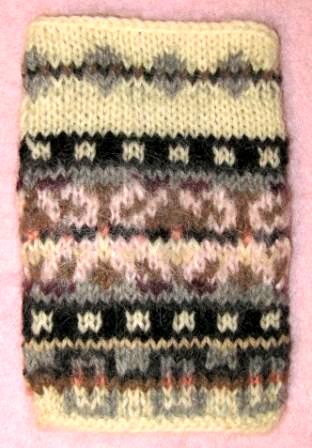
Then again, maybe the stock on the bottom was done on a machine, and then the FI band was knit by hand, which could also explain the gauge change between the stock and the FI. That also could explain why the stock in the upper part apparently isn’t the same gauge as the stock in the lower part. A little math with regards to the shaping on the top half will tell me which gauge they used to calculate that out, if I care to do it.
I’m too annoyed to go into the FI color issues just now, but as a teaser I’ll throw in this picture of my swatch: because I think it’s pretty, and I really love the pink MOHAIR I put in it, so it might make me feel just a tiny bit better. (Plus, it may end up being the only part of this FI that I actually knit.)
6 comments for “Nutcracker Sweet, Part 5 – the fit of the bodice”