Ahem, ahem. OK, yes, you are right — the last post in this series was in July. Just barely not in June. July 1, to be exact.
Of course, I did include this bad boy in the UFOlympics, so technically, the last post on this project was more like, oh, late August.
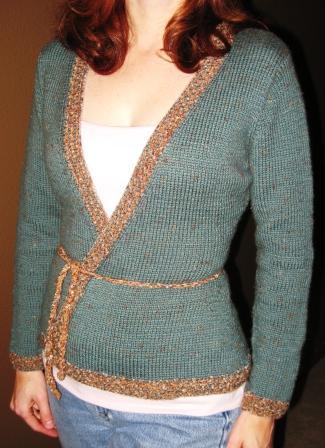
But enough about my blogging calendar. Here’s the final post on the Wrap Cardigan. Finally.
So where were we? Well, you must admit the exciting part is over and done with, and now we are down to the dreary finishing bits. I had to finish out the sleeves — check. I had swatched the seed st trim — check. I still needed to rip out the ribbing at the bottom and then add seed st trim everywhere.
Then I needed to figure out how to close it, and I admit I’ve been letting this one languish in between sewing on snaps and making ties. Somewhere along the line I was forced to realize that tweedy wool yarn is simply NOT SASSY — no matter how low-cut the front ended up — and I kind of lost my enthusiasm for the project.
However, I am not one to shirk my duty, so I soldiered on.
OK, the trim was to be seed st in a technique known as "three-row stripes". The way it works is this:
- Work a row with yarn A. Drop it and tie on yarn B.
- Work a row with yarn B. Drop it and tie on yarn C.
- Work a row with yarn C.
- Yarn A is now hanging out right there, waiting for you to pick it up and work another row.
- And look, now yarn B is hanging out at the OTHER end, waiting for you!
No, no, it’s NOT MAGIC. But it is pretty clever stuff. One of those concepts that is simple to understand, but kind of hard to describe.
Let’s see if I can do a visual: 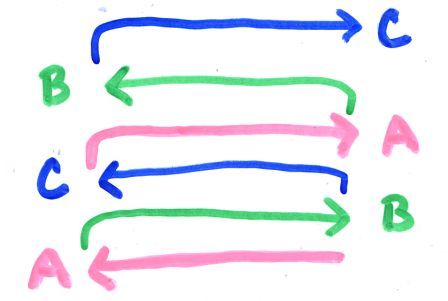 OK, here are 3 colors of yarn, A, B, and C. The arrow indicates which direction the yarn is going, and the letter indicates where the yarn ends up. So, on the bottom or first row, color A runs from right to left, and the yarn ends up hanging on the left. On the second row, color B runs from left to right, and the yarn ends up hanging on the right.
When you are ready for the second row of color A, it’s on that end, ready to work. Same for color B, and color C, and so on and so forth. Pretty cool, huh?
I’m sure this technique has been reinvented many times and many places, but I’m also pretty sure that each knitter who came up with it felt like a genius.
Obviously, you could do this in garter st, or stockinette, or any pattern st at all. But seed st has a nice way of blending 3 yarns together, because of the staggered knits and purls, like so:
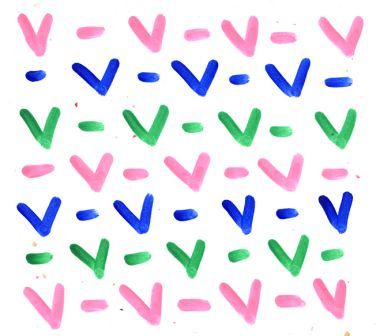 Not only are the knit sts staggered from row to row, as in the green knit sts being staggered over the pink knit sts. Also, the pink knit sts are staggered with respect to each other — see how the pink knit sts are staggered over the previous row of pink knit sts?
I’ve seen this done in many many different yarns, and I think you’d actually have to work at it to find a yarn combination that doesn’t look good in 3-row stripes in seed st. Pick a multicolor and then two solids that go with it, and you really can’t go wrong. It’s a great way to use up leftover yarns that aren’t quite enough for, say, a full scarf on their own.
The only problem is, seed st is a bit dense — so when using it as the main fabric in a garment, it can get a little heavy. (I suppose the other problem for American style knitters is that seed st can be slow, nay, even tedious, with all that yarn switching back and forth. I haven’t tried doing 3-row stripes in double seed st, though — that would speed things up a bit.)
A couple more things to remark upon, vis-a-vis the trim:
Seed st is wider than stockinette st, so I decreased something like 20% down from the number of stockinette sts that I started out with on the sleeves and hem of the sweater, in order to to get the trim to lie flat and not puff out. I used the cuffs to experiment and find the correct amount to decrease, since it is less knitting when you get it wrong the first couple of times. Usually I start with a 10% decrease but that wasn’t anywhere near enough, so I think I went to 15% and finally to 20%.
 Second, I decided to knit the trim along the hem separate from the trim on the fronts and neck. My reasoning was that if the trim didn’t lie flat on one place or the other, I would have less rework to do; and in this particular trim, the butting of the edges at the bottom corners (instead of a somewhat more proper miter) would not really be very noticeable.
I also sewed 2 sets of clear snaps onto each of the bottom corners of the trim, and to the corresponding places where the corners end up when the sweater is wrapped, to keep the corners from drooping down past the rest of the hem when the sweater is worn. Clear nylon snaps can be a knitter’s best friend.
Finally, I crocheted some ties out of the two contrast yarns — I left out the main color yarn because it would have made the ties too bulky — and attached them to the trim.
Et, le voila! at least I’m wearing it over a pink camisole. Semi-sassy.