 Short rows are one of the best shaping tools in a knitter’s repertoire. They are so useful: for sock heels, fitting busts and shoulders, curved hems, and the list goes on. This post discusses short rows in general, and five techniques to get the job done, so why not find your favorite?
(For a discussion on how to calculate and knit short row bust darts, see this post.)
What Are Short Rows?
The basic idea of a short row is to turn your work around in the middle of a row, and add extra partial rows of knitting to build up fabric, either to create a flat wedge shape, or to fit smoothly over a curve. The difference in whether your finished fabric lies flat, or if it pooches out into a pocket, is in how many short row turns there are, how close they are together, and whether the additional fabric created is constrained on both ends.
Short rows are commonly used for sock heels, bust darts, and shoulder shaping. They are always worked back-and-forth, though they may be inserted into a piece worked in the round.
Short rows can be worked in two different configurations: one where the short rows get shorter and shorter, forming a pyramid shape of extra fabric, and then full length rows are worked across all stitches; the other where the short rows start short and get longer and longer, forming an upside-down pyramid shape of extra fabric. In both cases, the resultant shaping of the finished piece is nearly the same.
Short rows can be worked in pairs (at either end of a row), or singly (at only one end of a row).
Five Short Row Methods
Why bother learning how to do short rows at all? Well, if you simply turn a piece of knitting around in the middle of a row and work back, you will create a gap in the fabric that must then be closed.
One older style of doing short rows is to slip the first stitch of the short row purlwise, and continue working – but this doesn’t completely close the hole that forms from turning around. So, we need to do a little more work to neatly close those holes.
Three well-known methods of doing short rows to avoid holes are:
- wrap and turn,
- YO, and
- Japanese.
A fourth method is called shadow wraps, and a fifth is the double-stitch or German method.
The first three I grouped together are actually three different ways of achieving the same structure, and shadow wraps are closely related. The double-stitch method is quite different from the other four.
Short Row Structure
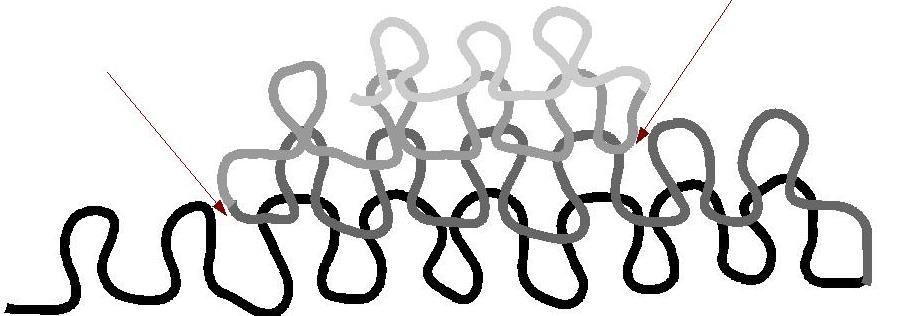
However — in all cases, no matter what else you have done, the structure of a piece of knitting wherein one has turned around mid-row looks like this:

The gaps that need to be closed are shown by these arrows:
In the first four methods of closing that gap, the bit of yarn on each short row that is going to get hooked up with the row below it is this bit in red:
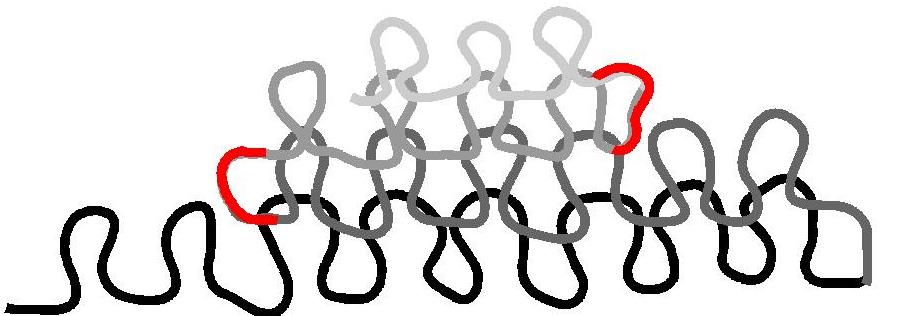
And the stitch in the base row it’s going to hook up with is in pink: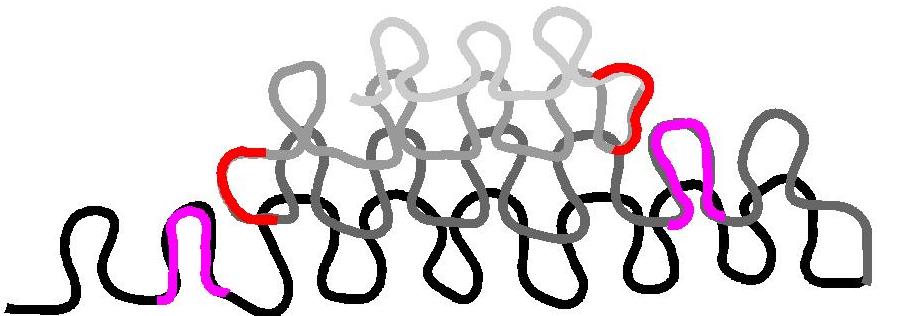
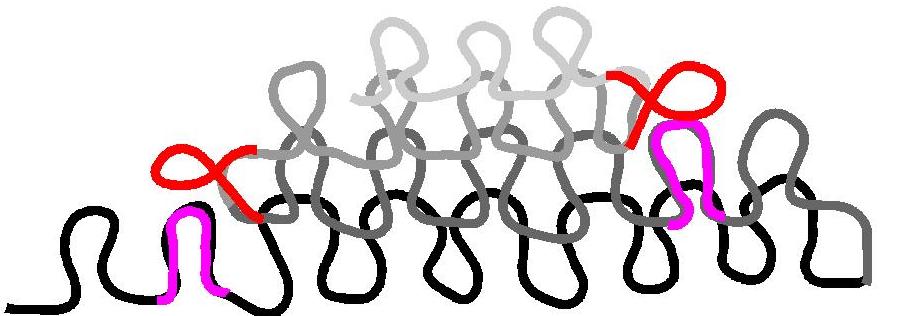
With the first three methods (Wrap & turn, YO, or Japanese) the pink st in the base row is going to be hauled up a row, to be merged with the red bit in the short row above. Or, with shadow wraps, the red bit is going to be looped through the same place that the pink stitch comes out of, thus forming a “shadow” of the pink stitch.
The end result is EXACTLY THE SAME STRUCTURE with the first three, and fairly similar with shadow wraps. The red bit is the wrap, the YO, the part you pick up with the stitch marker, or the shadow wrap — and it ends up getting worked with the pink st in all four cases, to close up the gap that you see between them.
- In the W&T method, the red bit gets wrapped around the base of the pink stitch.
- In the YO method, it becomes a YO at the end of the short row.
- In the Japanese method, a stitch marker is placed on the working yarn at the end of the short row to identify the red bit. Then when you come back to work the pink stitch, you use the marker to pull up the red bit and put it on the needle.
- In the shadow wrap method, you use the red bit of yarn to create a second stitch behind the pink stitch, in the same location as the pink stitch. (You could think of it as being like the YO method, but pulling the YO up through the same place as the pink stitch.)
- In all four methods, when you come back to work the pink stitch, you work the red bit together with the pink stitch.
Of course, that’s not to say that they give exactly the same results. Each of those options allocates a different amount of yarn to that red bit, which means some are looser and some are tighter. Without carrying out exhaustive tests, my educated guess is that the YO is the loosest, the wrap & turn is in the middle, and the pick-up-later is the tightest. The shadow wrap is much like the YO method, but the wrap is looped through another stitch and so does not lie across the back of the fabric.
To Twist or Not to Twist?
Now, there is one more option: whether the red bit is worked so that it is twisted, or not. Here’s what I mean by twisted:
I’ll use the wrap & turn method to illustrate this principle, since it is by far the most common method.
The act of wrapping a stitch involves moving two things — one is moving the working yarn from one side of the work to the other (and back), and the other is moving the stitch to be wrapped from one needle to the other (and back).
The order of those two things determines whether your wrap is made clockwise, or counter-clockwise. That, plus how the wrap is subsequently picked up, determines whether your wrap ends up twisted, or not twisted.
The short version is this: in standard stockinette, whether knitting or purling, if you move the yarn first, your wrap will end up twisted on the purl side. If instead you move the stitch first, your wrap will end up untwisted on the purl side.
I was in doubt as to whether a twisted wrap vs. an untwisted wrap would make a huge difference, other than I expected the twisted one to be a little tighter and thus neater-looking. I was wrong on both counts. So, I say don’t twist your wraps — move your stitch first.
[BTW, note that the stitch that is being wrapped is always slipped purlwise, so it doesn’t twist. I know Cat Bordhi’s video on youtube says knitwise, but she also hauls the wrap over the st first and then works the stitch & the wrap tog tbl, and frankly, all those extra shenanigans aren’t really necessary. If you do things right, and give the knitting a good tug if necessary, the wrap should duck out of sight in the back because that’s where it wants to be anyway.]
To Slip or Not to Slip?
As if that isn’t enough, there is yet one more option. That is whether to slip the first st after the turn, or work it. Some suggest to slip the first st after you do the turning around part, in order to minimize the 2-row “step” being created by the partial row. I don’t buy it, because all it does is change where the 2-row step is. It buys you something the first time you do it on each side, but every subsequent time it doesn’t. Since you’ve already moved that end st “down” a row by not working it, the next time you meet it, even though you also move the new end st “down” a row, they are still going to be two rows apart.
So, maybe that doesn’t make a heck of a lot of difference — but the other undesirable effect this has is to create a longer float on the WS of the work, behind that slipped st. Not an improvement, to my mind, so I say forget about slipping.
How to Work Them
This tutorial takes you through all five methods, doing the same set of short rows each time, over 20 stitches. It’s a good experience to at least try each method once, then decide which one you prefer. But if one method bogs you down, don’t get too stressed! Just skip it and try the next one. Happy knitting!
Short Row Chart (click on chart for larger version)
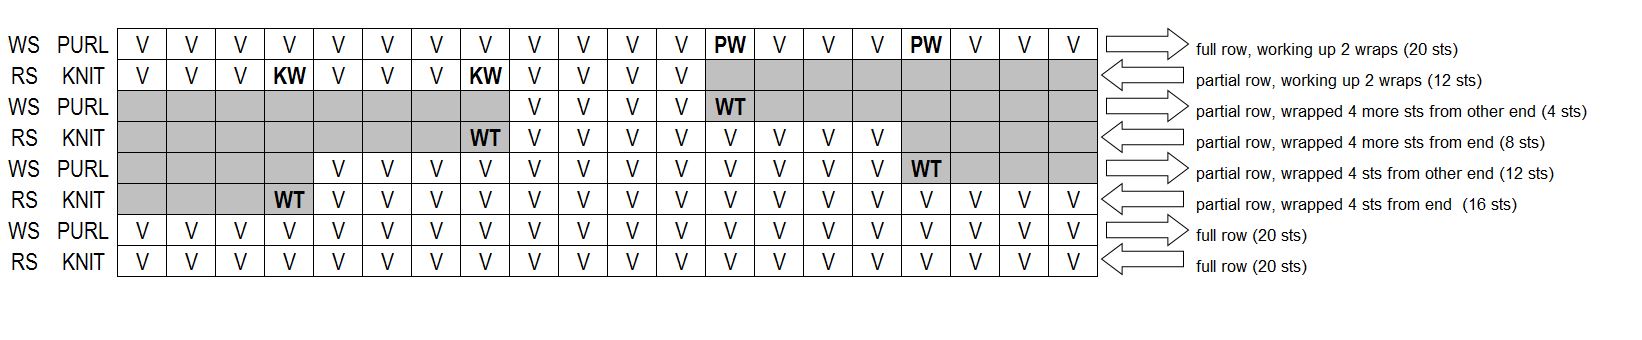
Wrap-and-Turn Method
CO 20 sts. Work two full rows of stockinette; these are the first two rows on the chart.
Row 3: K16, WT (see blue text below)
Row 4: P12, WT
Row 5: K8, WT
Row 6: P4, WT
Row 7: K to end (12 sts), working up wraps on 5th and 9th st (see green text below)
Row 8: P to end (20 sts), working up wraps on 13th and 17th sts.
Wrapping and Turning
1) Work to where you want the partial row to end.
2) MOVE THE ST: Slip the next st (purlwise) to the right needle.
3) MOVE THE YARN: Take the yarn between the needles to the other side of the work.
4) MOVE THE ST BACK: Slip the same st from the right needle back to the left needle.
5) MOVE THE YARN BACK: Return yarn to original side of work.
6) Turn your work. Work the next row or partial row.
Working up wraps
1) Work to the wrapped st.
2) Use the tip of the right needle to pick up the wrap: Go to the right side of the fabric and go underneath the wrap.
3) Now, work the st and the wrap together as follows:
Knitting: go into the st itself and K the st and the wrap together.
Purling: lift the wrap over the st, onto the left needle; then P the st and the wrap tog.
EXTRA INFO: These directions are for stockinette st. Believe it or not, things get a little more complex in garter st. But, it isn’t always necessary to work up the wraps in garter st.
These directions give wraps that cross over themselves when they sit at the base of the st, but become untwisted wraps when they are picked up and worked.
YO method
Follow the same instructions as above, but instead of wrapping & turning — turn the work first, then make a YO on the right needle.
Making the YO:
Looking at P side: take yarn to back over right needle; bring yarn to front between the needles.
Looking at K side: bring yarn to front between the needles; take yarn to back over the right needle.
Working up the YO:
When you are doing the full rows, whenever you come to a YO:
K2tog the YO and the next st; or SSP* the YO and the next st.
*There is a trick to SSP: After you slip the YO kwise and the next st kwise, you must return both sts to the left needle and then come at them from the back side, underneath, in order to purl them TBL.
EXTRA INFO: Some directions require you to make a backwards YO and then correct the st mount before you work the YO and the st together. Some say do a backwards YO on one side, and a regular YO on the other side. If any of these maneuvers helped tighten up the YO’s I’d be all in favor of them, but they don’t for me, and I feel this needlessly complicates things.
Overall, I find this method to be the loosest and least satisfactory.
Japanese Method
The Japanese method requires a marker of some kind: a coilless safety pin, a bobby pin or a Clover st marker (the clippy green and orange kind) will all work.
When making the short-row turn, simply place one of the markers on the working yarn and turn.
When working the full-length rows, as you come to the markers, pull the marker up and place the loop onto the left needle with the top part of the loop to the front. Then work exactly as for the YO method (green text, above).
Double-Stitch method
I have a tutorial on using this method on a sock heel, with pictures, here.
Note: This text version is slightly simpler, as it incorporates the genius refinement of always knitting the last stitch before the short row turn, so you don’t have to do two different kinds of double-stitches.
At each short-row turn, knit the last stitch before the turn, regardless of whether it is a RS or WS row.
Then turn work and make a “double-stitch” as follows:
Hold yarn to front, slip next st pwise (the stitch you just knitted).
Take working yarn to back over right needle; then take working yarn to front between needles, pulling snugly so that the slipped st falls to the back, and the stitch in the row below is pulled up over the right needle – double st made.
Keep the working yarn to the left of the slipped st as you bring it over the right needle, so the st that is pulled up from below IS NOT twisted.
Working the double-stitches: When you are doing the full rows and you come to the double-stitches, work them by inserting the right needle under both forward loops of the double st, and knitting or purling much like for a k2tog or a p2tog. Be careful to pick up both front loops, and only the front loops.
Shadow Wrap / Twin Stitch method
At the short-row turns, you make a “shadow” or “twin” stitch by making a lifted increase in the turning stitch. This new stitch will then be worked together with its matching original stitch when finishing the short rows.
There is a really nice tutorial on this method, with pictures, here.
2 comments for “Short Rows, Thoroughly Explained”