 I got the Tahki Stacy Charles newsletter today, and there is a free pattern for download for a pretty cute little summer cardigan called Renata.
There is also a video of the garment where you can see a 360 degree view of it on a model.
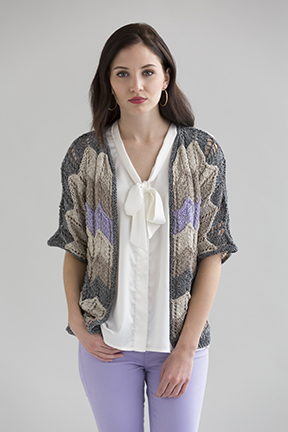
A model who keeps her arms deliberately down at her sides. Just like in this picture.
Hmmm.
Suppose they are hiding something? I do.
The Problem
I like this design enough to be curious about what exactly is wrong with it. So, I downloaded the pattern and checked the schematic. This is the only way to really tell what is going on with a garment — photography can lie in oh, so many ways. Lies of omission are the most common, but there are a lot of other little tricks. One of the most common things they like to hide, and an easy one to hide, is poorly fitting armholes. So let’s start there.
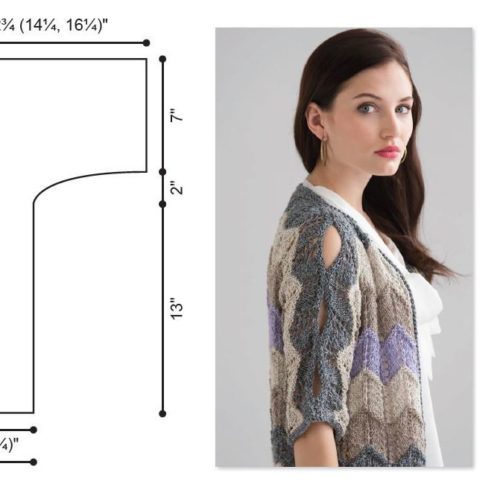 Interestingly, the schematic doesn’t look like there are really horrible, baggy armholes. They are shown to be about 9″ deep (and note the armholes are the same for all sizes – another red flag). But while 9″ armholes may be a little generous for smaller sizes, it isn’t too crazy — especially not for a loose, breezy cardigan.
Note that this is the only other picture of the garment on a person, though, and it still doesn’t show those armholes. I’m still skeptical. I think something about those arms or sleeves just does not look good, even on a lovely slim model. If a professional model and photographer can’t make this design look good in any pose but this, chances are kind of against you that you’ll find a way to do it.
After some more cogitating, I am pretty sure I know what the problem is: that chevron pattern stitch is lovely, but it also has a lot of zig-zag to it, if you see what I mean.
When you sew those bottom sleeve seams in the usual way — which is what they tell you to do — this is going to pull them into a kind of funny shape, especially since the highs and lows of the chevron will be fighting one another along the bottom of the sleeve. And I bet the hem isn’t real smooth either… oh hey, see that first photo, where the hem is hidden by her arm on one side, and bunched up on the other!
And we have at least one way to kind of double-check: I went back and took another quick look at the video, and sure enough, they don’t show you too much of the hem there, either.
Finally, I just noticed one more giveaway: back on the first photo, see how the sleeves kind of stick out pointy at the top of that last chevron, near her elbows? I rest my case. I bet those sleeves look like accordions.
This cardi looks cute in this pose, and was easy to design, too (and come to think of it, that’s why it doesn’t have any armhole adjustments for any of the sizes, because that would wreak havoc with the chevron stripes). But there is too much covering up going on here, even in this seemingly innocuous pair of photos and the seemingly revealing video.
The Fixes
So, if I were to make this garment, what I’d do here is borrow the cute parts and fix the rest. I like the stitch pattern and the cutout sleeves. The colors are nice, but not my personal faves.
The first change I’d make is to the yarn. This is not going to go over well with the company who designed it, and is trying to sell this yarn, but it is not the right yarn for this design. Their choice of yarn is described as “A crisp silk-viscose-cotton-acrylic blend in heathered shades.” Yeah, “crisp” is not really what this design needs. The fabric they have achieved is not drapey enough, and thus those sleeves hold that chevron shape way too… crisply. Instead, I’d be sure my chosen yarn was nice and drapey. Skip the crisp, springy silk in favor of a drapey plant fiber.
And in fact, that in itself might be enough to make this design work. Here is where Ravelry can be a great resource: you could do a search for similar cardis with chevron patterning and see if you can spot any that look nice and drapey — now that you know what to look for.
Second, of course, I’d choose colors that fit my wardrobe better. That’s pretty easy, although I will just suggest that you take a moment to notice that they used three neutrals and one pastel, and nothing super light (like white) or dark (like black). They stuck with soft shades, all in the mid-range. So if you want a similar soft summer-y look, don’t choose red, black, white and light blue. Instead, three different greens and a grey could make for a stunning garment.
Also: this could be a fun pattern to try mixing some yarns, too. Throw in a couple of textures!
As for the knitting: first, there are a couple of options to improve the hem. The safe one is to make at least the bottom third or so of the sweater in plain stockinette (probably in one color), which will give you a nice straight hem, and then start the chevron patterning. This will also give you the option to customize the length exactly how you want it — because the pattern only gives one length for all sizes, too. Of course, you could lengthen it with extra chevrons, too, but there you are stuck with doing it in chevron-sized increments.
But there is a jazzier alternative, if you like the zig-zag edge, and your fabric drapes well enough. Don’t try to fight the stitch pattern, and make it do something it doesn’t want to do. Instead, skip the ribbing, go right into the chevron and have that zig-zag hem be a feature. If you’ve chosen a drapey enough yarn, the points will drape, rather than want to curl or flip up. Of course you will want to do some swatching before you commit to that choice. Finally, a row or two of single crochet around the bottom edge afterwards would perhaps be heavy and firm enough to make it hang nicely.
At the sleeve cast-on, again there are a couple of options. One that is a little more involved is, when you cast on the sleeves, keep the chevron going on the body, but don’t start it right away on the sleeves. Work the sleeves for a while in plain stockinette, in the area that is going to be the underarm anyway, and then start doing the chevron at some point to match the body. This option of including some stockinette kind of goes with the first hem option, and might make for a somewhat more dressy-looking garment.
It’s hard to tell which stripe the sleeve starts on with those arms so firmly down at her sides, but I might even knit stockinette on the sleeves until that last grey chevron at the top, so you can get the cut-out sleeve effect without having zig-zaggy sleeves. But without swatching, it is hard to say how well the stockinette on the sleeve and the chevron on the body will play together, in terms of gauge. The pattern stitch is stockinette-based, so it ought to work OK, but again, when swatching, you would want to try maybe half your swatch in chevron and half in stockinette to be sure.
And after all that thought, it occurs to me that a much simpler option would be just to knit the sleeves according to the pattern, and when you seam the sleeve, do exactly the same cutout effect under the sleeve as you do on the top! It won’t show to much effect, but it sure won’t be any more work, and it will absolutely improve the way those sleeves hang.
Without testing, I can’t guarantee that my ideas will work perfectly — but I would bet good money that they are an improvement over whatever the original sleeves will look like when you eventually have to raise your arms!
2 comments for “Project Prep: Beware of Photographs – Renata”