
When changing colors (or yarns), if you purl on the RS of the work on that first row, you’ll end up with the new color showing up as purl “bumps” or “blips” in the old color. So what are you supposed to do if it’s ribbing?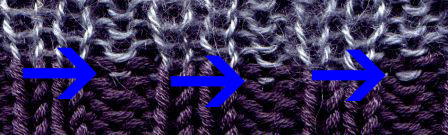
If you want a clean color change in ribbing – or any time you have a purl st involved in a st pattern – you can introduce an all-knit row on the right side of the fabric when you introduce the new color. Depending on the st pattern, this all-knit row can be surprisingly unnoticeable.
I learned this hint from Jacqueline Fee’s “The Sweater Workshop“. I didn’t use it on my Sassy sweater, because that ribbing was going to be fairly stretched out when worn, and I was not sure whether the color bumps or an all-knit row would be more noticeable. Frankly, in such a similar color, the idea of bumps didn’t bother me enough for me to swatch it – so I just went with the bumps, as you can see in the close-up above.
 On this more recent FO, though, I felt that the color bumps would be very noticeable. So instead of following the pattern instructions to “change yarns and then work sts as they appear for one round” (meaning K1, P1), I changed yarns and then knit all sts on the first round of the new color, for a very clean change.
Ribbing Stripe Exercise:
You’ll need two contrasting colors of yarn for this swatch.
Work an inch or two of ribbing in any pattern you like. {K2, P2} is a favorite of mine, if you can’t decide.
On a RS row, change yarn color and work the first half of the row in your rib pattern, and the second half just knitting, no purling. This should put color bumps on the first half of the swatch, and no color bumps on the second half of the swatch.
Continue the rib patt in the new color for several rows, and compare the looks of the two halves of the swatch. You’ll see that the all-knit row isn’t noticeable, except for that super clean color change!