OK, so I’ve got most of the yarn – one color is on order – and I’m on gauge.
Most people jump in and start knitting here, but not me. As I’ve said, I’ve learned the hard way that too many projects are doomed to failure in the beginning stages. Besides, I usually end up making some kind of changes to written patterns. And I always make a tracking sheet before I start knitting.
What? What’s that, you ask? Well, read on. We’ll get there.
Right now, it’s time to take a look at the garment construction and decide how I’m going to knit it. For example, what am I going to do for selvedges? What cast-on to use? Any other issues?
Well, yes. Unfortunately, after reading through the directions, I have to conclude that this sweater has a few fatal flaws, as written.
Technical Issues
The first and biggest issue is that the lower & front edges have absolutely no edge treatment. No ribbing, no nothing. This means they are going to roll. I don’t care what it looks like in the picture: they could have glued them down, for all I know. In real life – which is where I plan on wearing this – the edges will roll, unless I do something about it.
(And, after a much closer look at the picture, it turns out that little wad of black hanging off the left front corner is, in fact, due to the lower edge rolling. Yuck.)
I don’t want to add ribbing or a seed st band – that will drastically change the look of the sweater. Instead, I need a hem or facing to keep the edges flat.
After consulting a few of my reference books, I found that Principles of Knitting (by June Hemmons Hiatt) has the most info on hems. First choice to be made is whether to hem the edges with knitted fabric, or face them with ribbon. I’m leaning towards knitted hems.
If I do knitted hems, there are three more considerations: I’ll want to split the yarn in half to reduce the bulk of the hem; I’ll need to decide whether to knit the hems in situ, or pick up and add on hems later; and I’ll want a mitered corner on the lower front.
Well, there are 3 plies in Ultra Alpaca, so I have a choice of using either 2 plies or 1. That question ends up being decided for me: because when I split a piece of yarn into 1 ply and 2 plies, I find out that a single ply has barely enough substance to be wound into a ball by hand, let alone knitted.
And, of course, then I have to swatch.
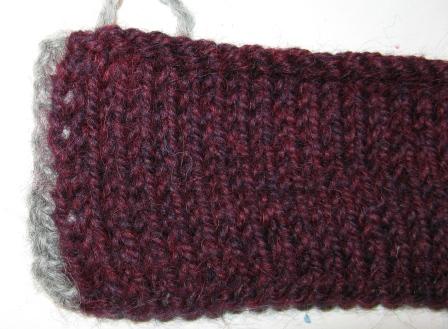
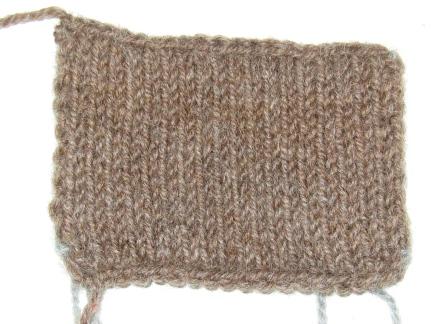
First hem swatch:
- using 2 plies of the 3 in the original yarn,
- same # sts and same needle size as the original swatch,
- horizontal hem = picking up in the back loops of long-tail CO,
- vertical facing = picking up and knitting along selvedge, working one add’l row before putting in a purl turning row, then working facing.
RS of swatch
WS of swatch
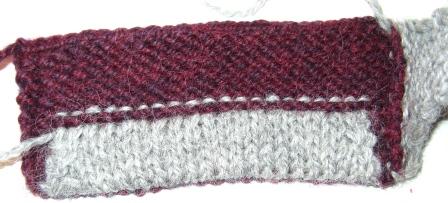
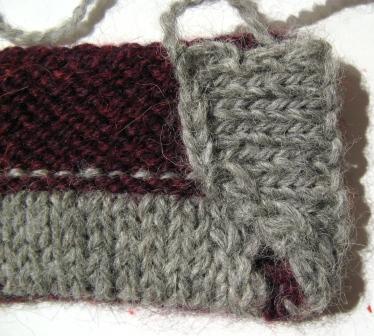
Closeup of mitered corners on hem (bad) and facing (good)
Evaluation:
1) Horizontal hem: this indicates that the pick-up-after-the-fact option will work fine for the bottom edge. I plan on doing 6 rows, 3 in black and 3 in grey, just as on the front of the sweater, and grafting it to the wrong side of the piece. Looks nice, doesn’t it? And not too bulky.
My miter on the hem doesn’t look too hot though. Decreasing 1 st each end, every other row, doesn’t give a 45 degree angle; which I kind of knew it wouldn’t, but I wanted to see how far off it was. Pretty bad. Looks like decreasing 2 rows out of 3 will give me what I’m after.
2) Vertical facing: unfortunately, as you can immediately see from the RS swatch – and so did I once I got there – the pick-up-after-the-fact option will NOT work well for the facing, unless I want a narrow single-color edging along the fronts of the sweater. I don’t think this will look too great along the sides of the Fair Isle band – far too obvious. If the FI band had a single background color, I suppose I could knit that section of the hem in the background color – but it doesn’t.
The miter looks much better though.
This option might be better than nothing, but let’s try out Plan B.
Second hem swatch:
- using 2 plies of the 3 in the original yarn on one edge (right side of the WS picture, left side of the RS picture); and using the full size yarn on the other edge,
- using a vertical knit-in bias facing (again from PoK),
- increasing the rate of increase on the miter to try to get more of a 45 degree angle,
- and in the real garment, in order to use the half-weight yarn in the facing, I’ll need to knit that part on using intarsia to switch yarns at the fold. I used intarsia on both edges here, so both facings are in the light grey.
WS of swatch
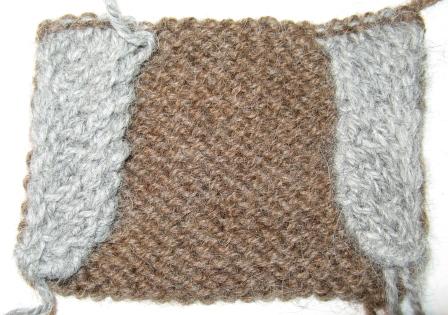
RS of swatch
Evaluation:
While the lighter weight facing is less bulky, the full size facing is much straighter – and it’s not a heck of a lot bulkier. I may not need to bother with the intarsia after all, which would be a lot cooler than trying to split about two front facing’s worth of yarn. The miter is better also, using the increase rate of 2 out of 3 rows.
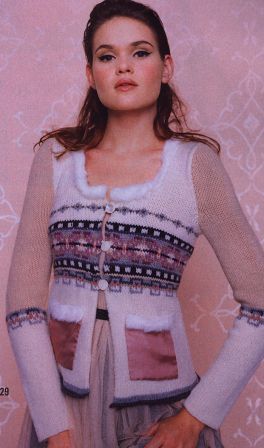
The second technical issue is that the Fair Isle charts aren’t centered with respect to the garment. Maybe this is just me, but that major rose-colored OXO motif right smack across the bosom looks just freakin’ cockeyed. I’d go bananas wearing that.
Actually, and interestingly, according to the actual instructions, the motifs should be centered on the garment. The appearance of cockeyed-ness could be due to the front edge rolling. I’ll just have to make sure everything is centered properly when I get to that part.
Also, the various motifs don’t line up with each other. For example, I think the salmon dots ought to be aligned. Notice the single dot is in a 12-st repeat and the pair of dots is in an 8-st repeat, so you can’t 100% line them up with each other. But you can first center the single dot with respect to the pair of dots, and then the alternate single dots will line up with respect to the 5-st gap between pairs of dots, etc etc. In the original, the single salmon dot was lined up with one of the pair of dots and then nothing else lines up with anything. I mean, how crazy is it to have the charts offset by one stinkin’ stitch? So, I have rewritten the charts using Excel. This way I can play around a bit with the colors too.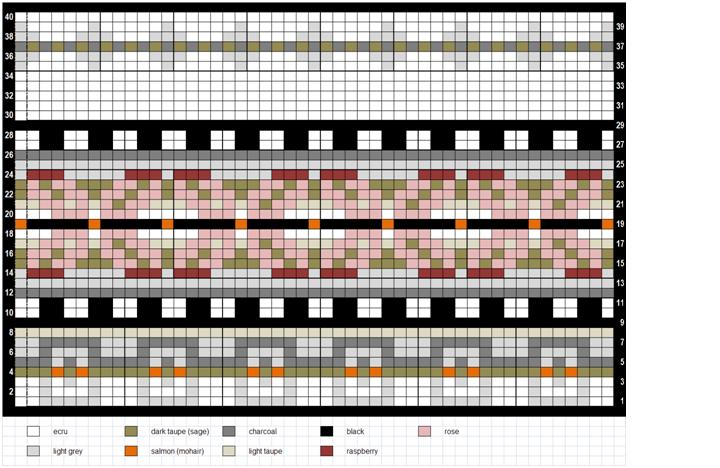
Third technical issue: The body is written to be worked flat. The sleeves of this sweater are written to be worked in the round to the sleeve cap, where it then changes to working flat.
This is just an blatant invitation to the Gauge Gods to wreak havoc. (In the words of Ron Weaseley, "Come and have a go, if you think you’re hard enough!")
I see no good reason to knit the sleeves in the round, other than to avoid the sleeve seam — and you’re going to have to sew that sleeve cap into an armhole anyway, so it’s not like it’s a seamless sweater.
Notice that the body is knit flat, with the armhole open only at the top, and the sleeve is going to be either open at the bottom of the armhole, or not open at all. Thus the sleeve can’t be sewn into the armhole flat. It’s going to have to be set in like a traditional set-in sleeve in sewing, which ain’t going to be any fun. Oh, well. I just have to hope the cap shaping and armhole shaping are done properly so it will be as painless as possible.
(I suspect the designer just doesn’t like seams and generally tries to avoid them – since the body is knit in one piece, which avoids the side seams.)
It would make more sense to knit the sleeve in the round if the body of the cardigan were also to be worked in the round — this is the more traditional way of working Fair Isle anyway, and it’s easier when it’s all worked from the RS — but then we’d need a steek. Which wouldn’t be so bad, as then we could have some nice front facings as well. But since I’m already getting gauge working flat, and since I don’t personally have an issue with working Fair Isle on the WS, and since I put all that work into figuring out the hems & facings — I choose to knit the whole thing in a consistent manner, i.e. flat.
Fourth technical issue: The bottom of the body is tipped with a charcoal and light gray stripe at the hem, but the sleeves are plain. Because the garment is symmetrical and has geometric patterning, I believe I will also tip the sleeves at the cuff, just as on the body.
Whew! That’s plenty enough for one post. Next in the series, I’ll talk about fit issues — some specific to myself, some not.
Happy Knitting!
1 comment for “Nutcracker Sweet, Part 3 – the technicalities”