
Oh, hi. You got that basketweave sock done all the way to the heel then? Not quite? OK, good, we’ll "pick up" where we left off. (ha, ha, little knitting humor there. Very little.)
Last time we went through the exercise of setting up the basketweave pattern st so that it was centered on the instep of the sock. And we have a few more things to think about: I promised to discuss some other situations that might arise, and what to do about them.
BTW: it is probably worth mentioning here in big bold letters that instructions for knitting stitches are not always written in stitch dictionaries in such a way that they are symmetrical!! That’s because the most basic instructions are going to give you only one pattern repeat, and for symmetry, you also need to know over how many stitches the pattern will be worked. Sometimes this is specified; mostly it is not.
For example, there’s this "4 x 4 basketweave". That short phrase really tells you all you need to know to create the pattern st — but nothing about the symmetry. To include that, I would have to start off saying something like: "4 x 4 basketweave pattern, worked over a multiple of 8 sts plus 4: (K4, P4), end K4."
And anyway, even if your st pattern does say "over a multiple of X sts plus Y" — if it’s not already charted, it’s always a good idea to work it out for yourself on paper before you commit your whole sock.
That said, what are some of the other bugaboos that can happen? Well, there are a few.
Potential Problem 1:
Your chosen st pattern doesn’t fit evenly into the total number of sts for your sock leg.
This one is kind of a big problem. A couple of things you can do: one is to choose another st pattern.
Another option is to slightly alter the number of sts in your sock — that is, you may be able to just increase or decrease a few sts before you go into your pattern rounds, to accommodate your pattern st.
For example, if you plan on having a 60-st sock and your chosen st pattern fits into 62 sts, you can increase 1 st on the instep before you start the pattern rounds. There’s no law that says your instep can’t be 31 sts while your sole remains at 30 sts — until you get past the heel, at which point it becomes the back half of the leg and also goes to 31 sts.
Yet another option is to alter the st pattern to fit the number of sts you have. This is not as crazy as it may sound: I’ll bet it wouldn’t be beyond you to alter the 4 x 4 basketweave to be 3 x 3, or 5 x 5, or 6 x 6. Many st patterns are pretty symmetrical and amenable to being adjusted. Try it out with something simple, and try it on paper first.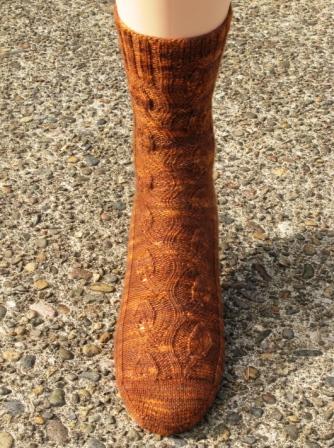
Watch out for edge stitches: when using a st dictionary to select your sock pattern st, make sure that you are not counting extra edge sts that are included for knitting back-and-forth.
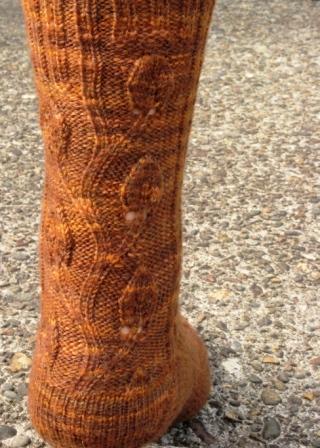
On the other hand, extra edge sts may be just what you need to eke a st pattern out to a larger number of sts, especially if you are trying to use a fairly large cable panel or something like that. You may be able to extend the design by, for example, adding extra ribbing sts on either side. (If I were trying to make this Vine Leaf sock bigger, for example, that’s what I would do. It’s not obvious in this picture nor in the one below, but there is a 2 x 2 rib down each side of the sock. I could add more of that if I needed it.)
Potential Problem 2:
Your chosen st pattern has an odd number of sts in it — but the number of sts on your instep is an even number.
In terms of symmetry, this means your chosen st pattern is symmetrical about a single central st, instead of being symmetrical between sts.
This gets solved similarly to one of the solutions for #1: add an extra st to the instep before you start the pattern rounds, and when you get there, do the same on the leg. I used this trick technique on the toe of the "Rite of Spring" sock.
Potential Problem #3:
Your chosen pattern st has important stuff going on at the edges of the instep that doesn’t fit into the number of sts you have available.
This one also occurred on the "Rite of Spring" sock toe. As the pattern grows wider along with the toe, I had to leave out some double decreases and YOs at the edges, to keep the st counts where I wanted them.
If you have balanced increases and decreases in your pattern st, make sure they stay balanced while you are working on just the instep — don’t cut off things on the edges that are needed to keep the st count stable. (Once you are working in the round, it shouldn’t be a problem if your st pattern fits properly into your total number of sts.)
Potential Problem #4:
Your chosen st pattern isn’t symmetrical at all, but is instead a one-way pattern.
 Again, we have a couple of choices here. One is to simply make two identical socks and pretend that you meant to make them that way.
Here is a perfect example: the Vine Leaf Sock pattern, which as you can see has a main pattern motif that does not fold neatly in half.

(You can also see that this pattern is now available for purchase as a Ravelry download. And, I have it on good authority that you need NOT be a member of Ravelry to purchase and download these patterns. Thanks for testing it out, Linda!)
Now, in this case, making both socks exactly the same might not have been that noticeable — but hey, we’re professionals here, or at least the person writing this post is. And the preferred method is to make the second sock a complete mirror image of the first sock.
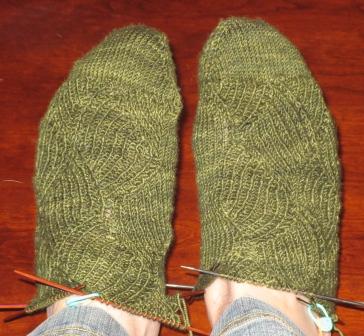 "Flipping" a knitting chart is not always as hard as you might think. I did this both on the Vine Leaf socks, and on the remake of DH’s Socks from Hell — you may remember, though not as vividly as I do, when he tried them on and the first thing out of his mouth was, "why aren’t they mirror images of each other?" which nearly got him killed.
Well, I’ve fixed that this time around.
In both of these cases, the chart divides pretty neatly in half: first half swerves one way, second half swerves the other way. For a mirror image, simply start the second sock using the second half of the chart. Simple, no?