Well, you can’t say I haven’t been keeping you in suspense! It’s been a month since the last post on the wrap cardigan: and against all expectations, I’ve made a fair amount of progress.
We have sleeves! (They actually go down to about 3/4 length so far, but none of the pictures that showed the full sleeves were decent enough to post.) And believe me, at this gauge, sleeves go s-l-o-w.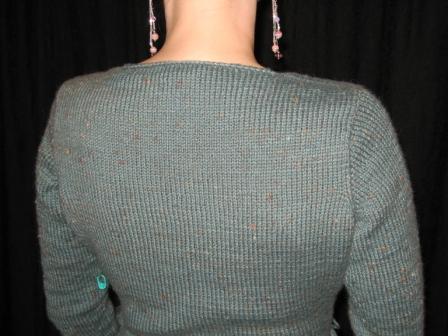

Not only that, we have set-in sleeves, worked in one piece from the top down. Wowser! And they fit so nice. Better than a raglan, on me, anyway.
Well, they fit nicely now. Of course, it was not exactly 100% smooth sailing to this happy point. (It never is on here, is it? But that would be so boring to read. You know you really come here for the train wrecks.)
Long story short:
- Following Barbara Walker’s instructions, using my gauge, I calculated how many sts I wanted around the upper arm. It was about 65 sts.
- I figured out how many additional sts I needed to cast on under the arms to achieve the desired bust measurement. I think it was 11 or 12 sts (for each u/a). This gets subtracted from that 65 total sts, to get the number of sts to pick up around the armhole itself.
- I counted how many rows comprised the armhole on the front and back, and divided that by my number of needed sts, to find out that I needed to pick up just about 1 st for every 2 rows around the armhole. Fabulous!!
- I picked up my sts around the armhole, cast on my underarm sts, and made sure I had the desired total of 65. OK, I actually ended up with 68 sts, what with rounding and so on.
- I then worked short rows across the sleeve cap, starting with 1/3 of the total sts at the top, and nibbling away at the remainder by 1 additional st every row.
When I was done doing that, I started going around and around for the rest of the sleeve.
And the rest is, uh, history. End of blog post. Nothing to see here, folks, move along.
OK, OK, here’s your train wreck, coming up.
Truth is, I ended up knitting approximately 3 sleeves total. (BTW: this seems to be about par for the course with me and designing.)
And, here’s a top secret big ol’ designer hint for you:
when deciding how often to do the decreases for the sleeve, "guessing" is not a really good method.
First mistake: I had to redo one of the sleeve caps because, at a crucial moment, I thought I was smarter than Barbara Walker, and I did something a bit differently than she suggests. We won’t go into the gory details — well, all right, I thought I’d do a row or so all the way around the armhole before starting the short row shaping. It really wasn’t that bad an idea, but it didn’t turn out looking as nicely as I wanted it to. So I turned to the other sleeve cap and knit that one as per the directions, convinced myself that sleeve cap #2 was better-looking than my idea, and went back to the drawing board on sleeve cap #1.
Then I did another foolhardy thing, which, as I alluded to above, was to not actually calculate the frequency of the sleeve decreases. I think I decided to do them every 5 rows at first, as that is EZ’s "standard" increase rate — but I failed to realize that this works much, much better when starting the sleeve at the cuff and knitting upwards. In other words, when increasing. Doesn’t work too well when going the other way. My sleeves were just a bit too tight.
So, I ripped back to the sleeve cap, and then, for some unfathomable reason —
I did it again.
I forget what bizarre "reasoning" I used, or indeed what result I came up with (I’m sure I’m blocking it out to protect me and my fragile self esteem) — but it wasn’t much better. I did have one data point that said every 5 rows was too often, so I think I went with every 6 rows, or something.
Not a whole lot better, frankly.
Finally, I took a few sleeve measurements off the faithful Nutcracker, and also off a commercial shrug I own, and kind of took an average of the two to get my desired sleeve widths at upper arm, elbow, and wrist. Then I translated these into numbers of sts:
- 12" at underarm = 64 sts (this jived with the 65 sts I had originally come up with. And coming off my sleeve cap I had 68 sts. Close enough.)
- 10.5" at elbow = 56 sts
- 7.5" at wrist = 40 sts
Ergo, a total circumference decrease of 68-40 = 28 sts, or 2 sts each time for 14 times.
I figured out the total sleeve length, less something for the trim, and converted that to rows:
- 16" x 7 rows per inch = 112 rows
112 rows / 14 decrease rounds = 8.0 exactly. So, I did decreases every 8 rounds (which as you may imagine, in the world of sleeves, is a fairly far cry from every 5 rounds, or even every 6 rounds). And it worked out much, much better.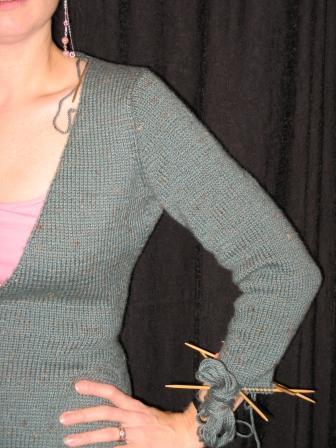
Although I admit, there does seem to be a teeny bit of extra fabric hanging out around the underarm there. It is the difference between 64 sts and 68 sts in the sleeve cap? Maybe. Is it an issue with the very deep V neck and the fabric pulling back towards the underarm instead of going across the bust? Potentially. Is it a matter of too many sts cast on at the underarms? More than likely.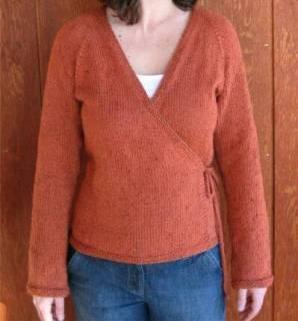
Am I going to rip it all back and find out? Hell no. It still fits way better than a raglan. I have to say, looking at those underarms, I’m really quite pleased with mine.
Now: what to do about the trim?
Originally, I’d envisioned some ruffles or something equally sassy, even girly; maybe in a floaty laceweight mohair; maybe some metallic strands; in short, I was heading down my usual gaudy glam road.
Eventually, however, even I could figure out that the classic, tweedy, smooth yarn and the relatively classic style of this sweater did not lend itself to that kind of trashy sassy accoutrement.
(And against all expectations, I figured it out before I actually knit it. We’re making progress here. Srsly.)
So, now what? well, I’m not 100% completely stupid. I consulted the oracle that is Sandi.
She suggested 3-row stripes in seed st: a favorite of hers and mine. Classy, yes. And you can hardly go wrong with this when trying to blend different yarns into a fabric.
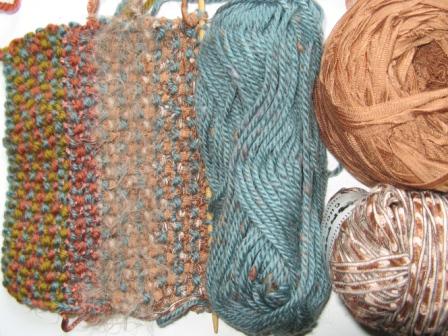
So I pulled a few yarns out of my stash, and set to swatching. The way I usually do this is switch out one yarn at a time until I get something I really like: and look, Ma! It only took me 4 tries! (wow, that CO is a little tight isn’t it? but heck, it’s only a swatch.)
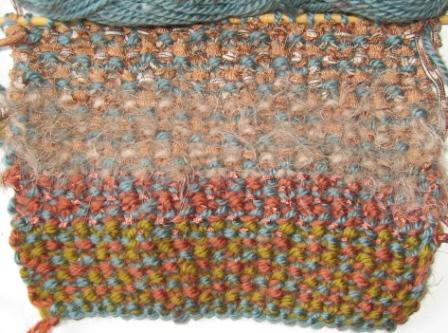
I’m happiest with the last two tries: trending away from the rust, towards the fawn and the beige. I’d love to use the fur, but let’s face it, it obliterates everything else and anyway, it’s been nixed for the same reason as the ruffles: it doesn’t quite go with the character of the rest of the sweater. Plus that teeny touch of black in the last one adds a certain crispness that I do like.
The yarns used in that last strip are these: it’s amazing how yarns blend using this technique, isn’t it? That’s the Cleckheaton Tweed used in the main sweater, plus some Crystal Palace "Choo-Choo" and an orphan solid fawn-colored ribbon that I picked up who-knows-where.
I’ll be replacing the existing ribbing at the bottom with the seed st trim, and adding the same trim along the fronts and cuffs.
The other change that has been made, mentally at least, is that I may ditch the "tie" part of "wrap cardigan", and simply use some clear nylon snaps to close the fronts, in a sort of double-breasted way. (I’ve just been using a piece of yarn as a stand-in for the tie when I’ve tried it on.)
If I want the bottom edges to stay even while I wear it — which I do — obviously I will need to have something, i.e. snaps, to keep them in place anyway, so why not use all snaps and forget the tie?
I didn’t have any great ideas going yet on how to do the tie anyway, except maybe a couple looooooong pieces of I-cord. Whee, what fun that would be to knit.
And, I may put decorative buttons on top of the trim, but I don’t plan on using functional ones. The snaps will be the business part.
I know, I know — the original design has morphed a ways. But for me that’s part of the fun. I think.