Warning! Parts of this post are verrrrrry graphic and may be disturbing!
Where we left off: I had knitted the back to the underarms, the fronts to the underarms, joined ’em up, and worked my way down to the waistline. And I was rejoicing over the fit of the armholes.
OK, now for the bad news: I failed to READ MY PATTERN — by that I mean the Knitting Pure & Simple pattern which was the original inspiration — and so, I failed to note that I needed to change my increase rate on the front edges after I joined the fronts and back.
In that pattern, the V-neck increases are done at a standard V-neck rate of 1 every 4 rows, down to the underarms. Then, it changes to once every 2 rows. A crucial point there. This allows the fronts to overlap all the way over to the side seams by the time you hit the waist.
So, my cardigan front is going to be a bit more open than originally planned…
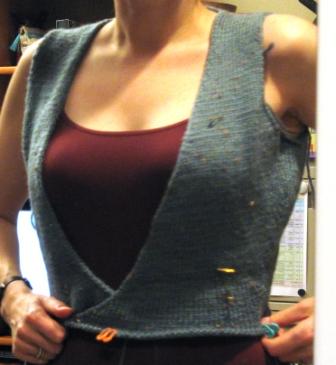
Oh, well. I’m not ripping that far back, for that "minor" detail. It will have some kind of front bands to help fill in that gaping front — though to be frank, I was originally imagining something fairly small and nondescript in the front bands department.
Ummmmm….. really, I was planning on wearing something under it anyway. And heck, it’s kind of sexy. And DH likes it, so it’s staying. OK — we’ll officially consider it a design feature from now on.
Bad news, part 2: I also got a little over-enthusiastic with my waist shaping. While I knew it was fitting a little funny in that region, I couldn’t figure out exactly what the problem was — and to be truthful, I was kind of worried that the problem might turn out to require a whole lotta froggin’, which I was not quite ready to face.
Finally, I dug out the well-fitting Nutcracker sweater, and laid this one on top of it. I was so pleased to find out that the problem wasn’t all that bad, that I didn’t take a picture. But to give you a clear idea, it kind of looked like this:
I just went about an inch or 2 too far. Well, that was only a little bit of frogging. No problem.
Now that I know that it came out OK, I should mention somewhere in here how I did the underarm-to-waist shaping: the usual calculation yielded a rate of 1 dec every 3 rows, which of course would mean doing dec’s on WS rows. So I averaged that out and did 1 dec at 2 rows, 1 at 4 rows, 1 at 2 rows, 1 at 4 rows, etc etc. I found my side "seam" st on each side, and went 1 st either side of it and placed markers, to set off 3 sts at each side "seam". I then did my SSK before the 1st marker, and my K2TOG after the 2nd marker.
Of course, all this means I also had a tracking sheet to keep track of V-neck increases (every 4 rows) and side seam decreases (every 2nd & 4th row). What it boiled down to, after working the 3" straight on the fronts for the top of the neckline, was printing out row numbers from 25 – 107 and marking every 4th one with a box around it for the neck shaping, and marking the appropriate side dec rows with "side dec" next to the row number. Very complicated code there.
Once I got that done, and ripped back the excess enthusiasm, I next worked straight for just over an inch for the actual waist. This is kind of a newer concept in knitwear shaping, as far as I know, and I suspect it is a good one. My trusty old Vogue Knitting reference book, and my older VK mags, usually show only a very few rows worked even at the waist, if any at all. This was how I learned to knit shaped garments, and this is how I shaped the Nutcracker. And while the Nutcracker fits pretty darned well, I have found during wearing that I tend to want to tug it down just a wee bit — which I suspect I would not do if it had a straight inch or so sitting at the waist. So I’m going to try it here. Rows 108 – 116, check.
Onward — to the hips!
Strangely enough, using the measurements off the trusty Nutcracker sweater, I came up with a waist-to-hip increase rate of 1 every 3 rows again. Well, easy enough to add that to my tracking sheet — cut and paste, anyone? BTW, the sweater fronts continue to increase at the same rate as before, also: because my choices were to stop ’em where they were, or continue ’em, and I decided I didn’t want the fronts to be chopped off straight down to the hem, halfway to the side seam. I thought that would make it look too much like a double-breasted style.
So, we’ll place a couple of markers, again 3 sts apart at each side seam, and do lifted increases to the right and to the left. Rows 117 and up, forge ahead!! Twenty more rows fly by like nothing at all.
Ruh-roh.
i put the increases in the wrong spot, george.
And here’s where the graphic portion of our show begins. Because I’m going to show you exactly how I fixed ’em without ripping back the whole bottom of the sweater.
And before you get to the end of this and say, "I could never do that", I’m here to tell you that yes, you could.
Hint: practice on a plain stockinette swatch first; then try it on a more complicated swatch. Something you don’t care about in the least. And when it comes to an actual project, why not try it? What have you got to lose? Sure, you’ll have to rip out the whole thing anyway, if this doesn’t work; but you might save yourself a lot of grief if it does work.
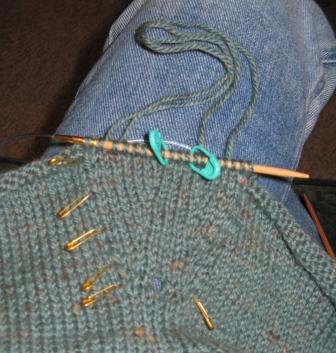
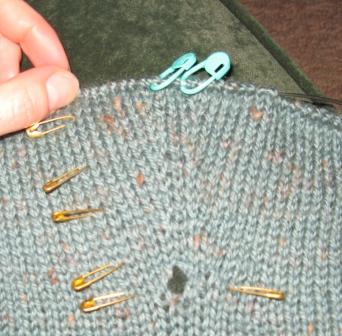
OK, the picture on the left shows the side I already fixed. This is (1) to give you some faith that it can be done, and (2) to show you what it is I’m fixing. See how the column of 3 sts makes a nice, pretty, long line, all the way from the armhole (at the bottom of the picture) to the current bottom of the sweater (where my thumb is)? And see how in the next picture, it doesn’t? It kinda starts out that way, but up by my hand, that column of 3 sts has been squished down to 1 st. Uh-uh.
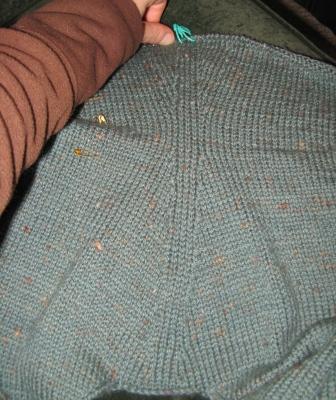
That’s because I put my increases too close in to the seam, and they disrupt those 3 sts that I really wanted to leave completely alone. Here’s what I did:
– – – – <+ – +> – – – –
And here’s what I should have done:
– – – <+ – – – +> – – –
where the "+" is the st into which I want to do the inc, and the "<" and ">" show where the new sts will lie. Notice the difference: in the first diagram, only one st lies between the sts that the incs are worked into. In the second, three sts lie between them, unadulterated.
Now, I’ll freely admit to a bad habit of mine, which is that I thought about this in the car for quite a few miles, during which I tried to convince myself that it really wasn’t worth fixing. Then I pulled up my big girl panties and got to work.
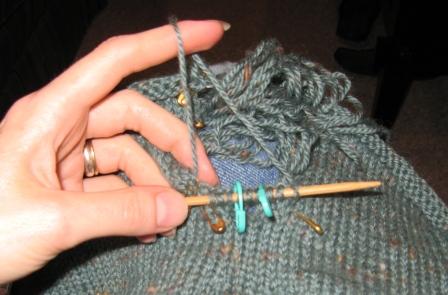
 Step 1:
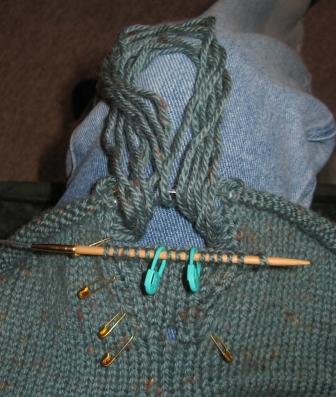
I have marked the area to be re-knit thoroughly with small pins. It is hard to overdo this step. At the bottom is row 117, marked with a pin on either side, which is the last row I want to rip out. On the left I have also marked every 5th row (120, 125, 130, etc), which will help me keep aligned with my tracking sheet — which is what is going to tell me which rows to do the increases on (again). That’s important, because we don’t want to change anything we did before, other than where the increases sit.
 I want to keep 5 sts on row 117 live, which are sort of marked twice (squiggly lines in "apricot") near the bottom of this photo.
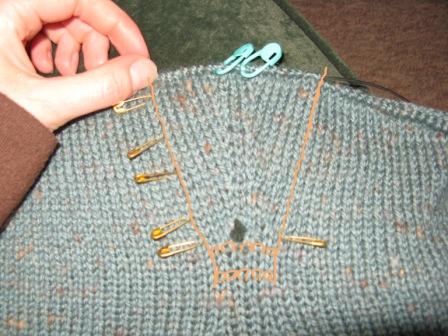
I have followed the neighboring sts all the way up to the current row, and figured out how many will need to be dropped — again, it’s sort of marked in the photo. (I thought "apricot" would look nice but it doesn’t have a ton of contrast, does it now?) The rest of the sts on either side of this section are being kept safely on a separate circular in the background. (P.S. that big hole is there for the tie of the cardigan to pass through when it is wrapped.)
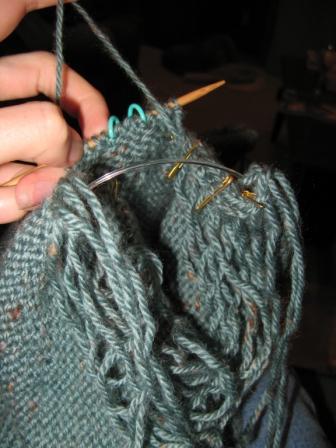
Step 2:
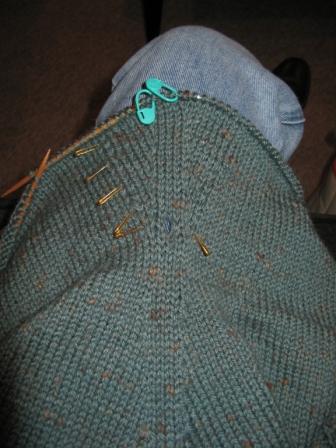
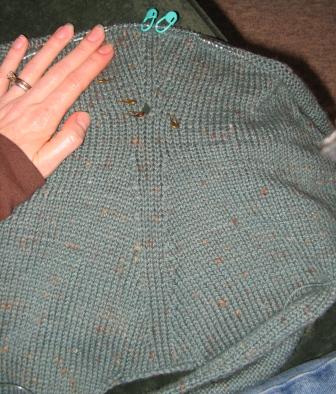
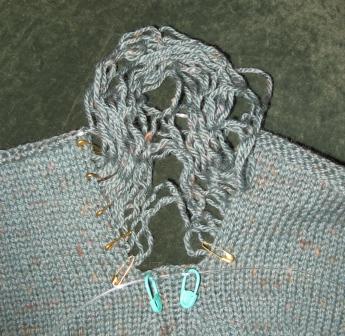
I have brutally ripped out the offending section. Pleh. The 5 sts at the bottom of it are safely on the cable of another circular needle. I now have green markers setting off the 3 sts with which I WILL NOT MESS this time.
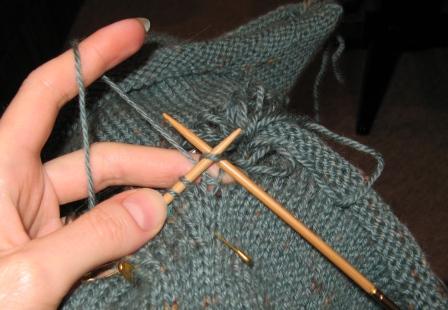
Step 3:
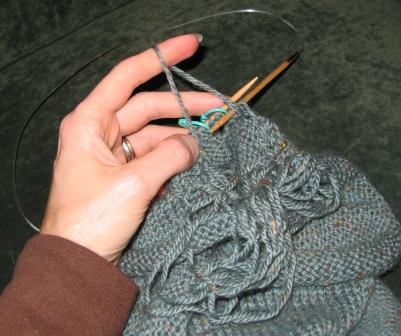
I start reworking the section, row by row, with each piece of yarn in turn. In this case, I am not changing the number of sts in each row — only their placement — so each piece of yarn should be the right length. If I were trying to change the number of sts in each row, then it would have to be a judgement call as to whether the fix could be made with the existing yarn lengths, or if the piece would be better off being fully ripped out and reknit. This is why the tracking sheet is important: if I try to do incs on a row where there isn’t enough yarn for them, or if I fail to do the incs on a row where they used to be, either way it will probably look like crap.
 It’s better, in my opinion, to work the first part of each row a bit tightly, for two reasons: one being that you’re gonna need all the slack you can get to work the last couple of sts of the section — a crochet hook can help immensely, too — and the other being that when you turn the piece around to work back, you’re going to be able to work any obviously extra slack at the end of the previous row back along it, as you work the next row.
So here we are, calmly repurling, reknitting, and, on the appropriate rows, placing our effing increases where they ought to have been in the first place…
Starting to look a little bit better now, eh? Oh, wait, there’s some more gratuitous blood and guts…!!
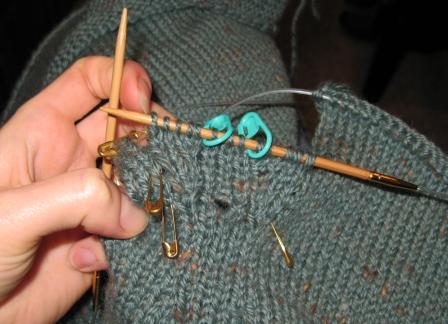
Nearly there… just two more rows to go… aaaand all done! You can uncover your eyes now.